 Wow. Things have changed in the garden. I was out of town for week and when I got back I was amazed how quickly things change this time of the year. Suddenly I feel like there is so much to do in the garden, and suddenly I am so far behind. Here is a brief update of the goings on...
It appears that everything has leaves, buds or flowers on it now; below I list what is in bloom.
Nesting Update
- the chickadees are bringing nesting material into their box (click here for my favorite nesting material combo- squirrel and moss).
- The flickers evidently completed the excavation of their box all while we were gone.
- The mystery this year was what was happening in the nuthatch box? The nuthatches "claimed" this box early on, but then some chickadees began excavating it, and pretty regularly. And there was no sign of the pair of nuthatches. Were these the same chickadees that were also going to nest in the normal chickadee box? And who's ever heard of 2 pairs of chickadees nesting the same yard? Craziness- they need a couple of acres because of competition for food. But now, all has been revealed- the nuthatches have returned and they are now nearly completely done excavating their box.
 Once they finish excavating they will probably continue their tiny onslaught of my bent willow furniture- shredding off the bark into fine nesting material for their little, freshly excavated cavity. Then they will carefully line to opening of the box with sap- lest I try to get back said components of my bent willow furniture. Order has been restored.
 Bloom Update:
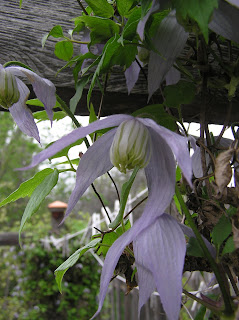
Flowering now- arrowleaf balsamroot (Balsamorhiza sagittata ), golden current (Ribes aureum), blue bells (Mertensia oblongifolia ), larkspur (Delphinium bicolor ), Jacobs ladder (Polemonium pulcherrimum), biscuitroot (Lomatium triternatum and L. dissectum), violets (Viola canadensis ) pasque flower (Pulsatilla patens), cutleaf daisy (Erigeron compositus, pictured above), blue virginsbower (Clematis occidentalis, see photo at beginning of the post of the virginsbower on my clothesline), prairie smoke (Geum triflorum), blue eyed mary (Collinsia parviflora, see below- this is one of my favorites, and it makes a nice groundcover), sivery lupine (Lupinus argenteus ), kittentails (Synthyris missurica ), Oregon grape (Mahonia repens ), and many more species flowering every day that it is hard to keep up. 
So much to do. Last weekend I removed a little remnant lawn patch that I have had my eye on to turn from lawn to what I call a mowable prairie. In the lawn's place I planted natives that can be mown and maintained- like a lawn was originally intended- a meadow that could be mown to a height that would allow for paths and play areas. Instead of a lawn or a water hungry meadow, I planted this with drought tolerant, trample resistant natives like yarrow (Achillea millefolium ), hairy golden aster (Heterotheca villosa), mixed aster and erigeron species.  After planting starts and transplants in the mowable prairie area, I covered the whole thing with mulch, but not just any mulch, gentle reader, a special mulch... this mulch is made from seed heads and flower parts I cut off last fall and kept in a bag out side all winter (cold stratification). Then I carefully (read: not at all) applied it to the surface of the fresh bed. I've found that with hairy golden aster, and my bag of assorted asters (by assorted I mean I can't really tell the difference between most asters and erigerons in my garden), they do great germinating when laid down in a mulch. I have been waiting for rain to do this, and by golly the rain has finally come (hopefully it will continue for a little while).
I did have a chance to also plant my potatoes, beets, peas, and other things I am probably forgetting and I finally built a new raised bed- for onions (see below, with cat guard installed), I moved the hill that was in its place and potted up all the asters and such that were on the hill. Maybe this weekend, I'll plant those potted up plants into the front yard or fill in other places in the yard.
After planting starts and transplants in the mowable prairie area, I covered the whole thing with mulch, but not just any mulch, gentle reader, a special mulch... this mulch is made from seed heads and flower parts I cut off last fall and kept in a bag out side all winter (cold stratification). Then I carefully (read: not at all) applied it to the surface of the fresh bed. I've found that with hairy golden aster, and my bag of assorted asters (by assorted I mean I can't really tell the difference between most asters and erigerons in my garden), they do great germinating when laid down in a mulch. I have been waiting for rain to do this, and by golly the rain has finally come (hopefully it will continue for a little while).I did have a chance to also plant my potatoes, beets, peas, and other things I am probably forgetting and I finally built a new raised bed- for onions (see below, with cat guard installed), I moved the hill that was in its place and potted up all the asters and such that were on the hill. Maybe this weekend, I'll plant those potted up plants into the front yard or fill in other places in the yard.
 Now I am well on my way to completing my 2010 garden project list (click here for this list). According to the list, the only thing left is making a new composter, but in reality, the list has really grown...
Lots going on suddenly, more updates with pictures to follow, oh and, a new arrival to the garden yesterday, a golden crowned kinglet.


 The 15th of April does not just mean the open date of spring black bear season in Montana, nor is it just the income tax filing date- to me the 15th of April is a reminder that the hummingbirds will be back soon. Hummingbirds are one of the few birds we set out feeders for. So its time to get them get them ready.


 Planning a garden?
 Click
Click  Although they are not my favorite flower, per se, I do find myself photographing them the most and even writing about them as much as any other flower (click


 It worked.
 A few weeks ago, I removed insulation from the windows, re-installed the solar window openers, removed the cold frames and started planting a lot of seeds in the greenhouse (native seeds from my list of
 Here were our
 Now I feel like I am picking my way through my
  As far as the visual component- I tried to make this shed a "transitional" design, that is one that bridges two styles in my garden. Also, the grill has always kind of stood out in the garden and kind of just floated there- it needed something to ground it and tie it to the landscape and visually connect it to the other structures and elements.
  I tried to design the grill shed to blend the two styles by taking stylistic cues from the arbor, laundry screen and elements like the multi paned divided light windows from the tool closet and greenhouse. So, this is a weathered cedar structure with painted windows, and a galvanized roof like most other structures in the garden.
 By the way, all the materials for this little shed were purchased from
  Spring is nearly here, though the calendar does not say it, and the groundhog evidently begs to differ. Nevertheless, some of the first signs of spring are apparent; black-capped chickadees are singing their lovey-dovey "cheeseburger"song, the smell of road-killed skunk (ahhh, spring), and a mourning dove in our yard today. Soon robins will be back, and spring will be here in earnest. Or not- it is February in Montana after all, but I digress. Anyway, I'll return to thoughts of spring...
 Here is the nest removed form the box. Chickadees and nuthatches will add material for their nests. Whereas chickadees use animal hair, fur, and moss (this as I have mentioned is the best use for introduced squirrels), nuthatches will shred up bark into various layers of increasingly soft bedding, and they also smear sap on the outside of the hole to discourage insects and parasites from bothering the nestlings. It is really fun to watch them do this. You can help chickadees by providing fur ( for more information click
  Below are pictures of tree nests from past years, each are unique, based on the availability of nesting material, the age and experience of the builders, etc... They are all soft and adorable, though. You can even see a couple of eggs in one of the nests- this was from a the second clutch one year that evidently had poor germination (a little something for you gardeners).
 Here is the box cleaned out. This is a good time to inspect for any damage and do repairs. If there is any water penetrating into the box, fix the cause and let the box dry out before repacking.
 Although I build nest boxes from western red cedar, a naturally decay- and insect-resistant wood, which needs no protection from the weather, I fill my boxes with Douglas fir (typically chips from my thickness planer or jointer- see below), but you can use any species except cedar, teak, or mahogany. These species contain oils that prevent rot and insect damage but the dust can irritate nestlings.
  It is important to compact the chips, and I just use a piece of wood to pound it into submission. By compacting the sawdust, the birds can excavate a cavity without the rest of the filling collapsing on them.
 Normally that is it, but this year, I got a birthday present from my wife...mini cameras! These are the
  I removed camera shield, to take up less space, I hope this is not a fatal flaw. In adding these cameras, I did not pack the wood chips to fill the box completely as you'll see. The first step is to mount the little bracket, and my only tip here is to mount it, so it is loose enough to be able to swivel the bracket to screw the camera to the bracket.
 Here is the camera installed in the chickadee nest box, notice the grove cut into the side for the wire to pass.
 Below is my northern flicker nest bow, and one thing to notice is that flickers just about completely remove all the wood chips for the box and they do not require any nesting material. although they may use an empty box, one benefit to having he house filled, is that is discourages use by non-target birds like house sparrows and starlings, which will not excavate. However, once the flickers excavate their nest box, often European starlings will follow. It is crucial to remove the starlings, their nests (they bring in nesting material), or otherwise dissuade them from taking the flicker’s nest box. Click
 Here is the completed, freshly refilled nest box with a camera, waiting to be excavated. If you look closely, you will see one of my own inventions on entrance hole- a Nesting Indicator Bar, also known as a "twig". I place these "twigs" in the entrance hole of all my nest boxes to monitor if birds are investigating the boxes. Kind of low-tech compared to the mini cameras.


 Below is Alex, the

