 The 8th Street Pocket Park is a small neighborhood park that uses native plants and landscaping to provide education and outreach to neighbors and students that my wife and I have been working on for the last couple of years. Because of its small size and out of the way location, this little piece of ground was neglected, growing only knapweed (Centaurea stoebe) and dog waste (no Latin binomial necessary). Located between an irrigation ditch and the intersection of 8th and Grant streets, the entire "park" was located in the city's right of way. A few neighbors saw an opportunity to work together and develop a wildflower garden, providing beauty and benefits to the nearby school and surrounding neighborhood.
Our goal was to build and maintain this pocket park as a little piece of wild Montana on the corner of 8th and Grant, by using plants native to the Missoula valley and to provide education & outreach to neighbors and students and a little wildlife habitat in our neighborhood. Our hope was that this park will be enjoyed by passersby, and provide a chance to stop and learn about native plants, and wildlife. To that end we developed and installed interpretive signs (see below), paths to interact and view the landscaping and installed benches to help turn this once weed patch into a destination.
In 2008, we completed the south portion (pictured in this post)of the pocket park (with significant help from a $2,000ish neighborhood grant) and we obtained a grant to complete the park this year by expanding the project by landscaping the east portion of the park. We also hope to continue the strong partnerships and neighborhood cooperation that made the first phase so successful.
The aspect of this project I was most concerned about was that as a public park, I wanted the plants to thrive, for weeding to be minimal, and for it to be a good example of native plant landscaping. My hope was that this would give people ideas for this type of landscaping in their own yards, so as a demonstration garden, this needed to look good. To that end, site preparation was essential, and we spent a lot of time on this.
The first step involved getting rid of noxious weeds through hand-pulling and herbicide treatments. The next step involved using a sod cutter to remove the "grass" (read: dog poop, quack grass, lawn, and dandelions). We installed lawn edging around the perimeter (see photo below), then removed all the sod, waited a few weeks, dug out or pulled everything that germinated, repeated this step again, brought in screened top soil, and compost mix to form hills, planted the area and covered it all with 6" of shredded cedar bark mulch.
From the time it was planted until the end of the growing season, we watered the little park every other day heavily. Since October 2008, we have not irrigated it, and have had only one weeding night. The plants have thrived and I think this has been a great public garden example.
Below part of the park is shown, August 2008, after the area was planted.
 Below is a picture of the same area in August 2009, after just one year of growth.
Below is just one of several interpretive signs...
 Again, the same location one year later.
 This is one of the only "before" pictures we have. Again, you can never take too many pictures before you begin a project- I never take enough (see my lament here). Below, volunteers are installing lawn edging and laying out the split rail cedar fence, in spring 2008. This picture was taken after we removed noxious weeds, so it actually looks like a lawn here- seeing the area as a lawn, in itself, was a lot of work and represented a lot of progress.
 This picture is taken roughly the same location in early spring 2009, and if you look closely you can see a black-capped chickadee on the nest box. This spring a pair excavated this box and raised a clutch- success!
 Below is roughly the same location in August 2009- plants thrived, despite no irrigation in 2009.
Since education and outreach were our primary goals of this project, we installed several interpretive signs in this little park. These signs provide information about the history of the park, the partnerships, as well as natural history of the area and specifically about native plants and wildlife found in the park. Below are examples of two of the six interpretive signs.

 Also pictured above is a National Wildlife Federation wildlife habitat sign. This park is certified as Backyard Wildlife Habitat because it incorporates the following elements: food, water, cover, places to raise young, sustainable gardening practices, native plants.
 Our neighborhood is deficient in parks and open spaces. Landscaping this site transformed existing public space from an unusable state into an attractive pocket park. While the final product of this effort meets a community need (more park space), the process of creating the native plant landscape also meets community needs.
My wife has been working with the local elementary school through the Flagship Program, an after school program for neighborhood children, and has lead field trips for dozens of children to this little garden. She has gone to classrooms to teach kids about native plants, has had them grow plants that we later transplanted to the park, and has had children help pant and weed this park for the last couple of years .
This project was also shared goal of the Montana Native Plant Society and the University of Montana's natural areas integrated plant management program (my wife's program) to provide education and outreach about native plants and their conservation. Despite the small size of this park, it has addressed multiple community needs, and it is a long way from its former state of knapweed, dog waste, and neglect.


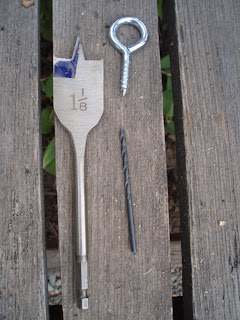


 Then, bore out holes for the suet. Place as many as you'd like, and drill them about 1" deep. Try to keep the upper holes at least 4" from the top, so non-native birds won't be able to perch on the top and reach down into the holes.
 Load the cavities with suet- it is easiest, but messiest to do this when the suet is room temperature.
 Install and watch for birds- let me know how they work.
 It is always amazing how quickly things change in the garden. I routinely make the same mistake and don't take enough "before" pictures. It is always fun and educational to look back on how the garden has changed, and I thank Nan Ondra at
 Below I have a series of pictures from 2000- 2009 from two angles.
 May 2004- I guess we did not sit for too long. Here you can see we added raised beds to the vegetable garden, and expanded all our native plant garden beds.
 June 2004- We expanded some beds more and
  June 2005- The changes here included
  July 2008- We kept expanding the garden beds and made the lawn even smaller.
 July 2009- Building the
  April 2000- This view is also of our backyard, looking to the northwest, and primarily shows our vegetable garden.
 May 2004- We added raised beds and a grape arbor, started more native plant beds, and removed more lawn.
 July 2005- We expanded the native plant beds, and painted our house, garage and bat house.

 The longhorn beetles aka aspen or poplar borers (
 All this activity on the aspen did not go unnoticed. Soon, bald-faced hornets moved in, displacing the ants, feeding on the larvae. And, if you recall, this is where the whole story


