Thursday, December 9, 2010

2010 Cat of the Year: Voting is Open

This year I have opened up voting for the coveted title of 2010 cat of the year. You can vote on the right until midnight Dec. 31, when the polls close. As you may recall, last year, Alex was crowned champion of our household. The nominees are listed below- the same as last year. Obviously, this has nothing to do with wildlife gardening or native plant landscaping, other than to say keep your cats indoors.

Squeak (pictured above)

Age: 17

Weight: 6 lbs

Breed:Blue Point Himalayan

Background: Outlived her people. Lead a life of pampered luxury

Pros: Great health, plays with Alex

Cons: Avoids Natalie and June. Requires daily brushing and hates it.

2010 Accomplishments: She has not killed us, plays with Alex, does not require that we feed her from a crystal goblet. She is our fluffiest cat, but also the most flammable.

Expenses: 1 vet visit for yowling, blood work, (diagnosis: dementia)

Cost per pound $16.70

Alex (Defending Cat of the Year)

Age: 9

Weight: 8.5 lbs

Breed: Turkish angora x Persian

Background: Innocent victim of a hoarder. He was at the shelter for 2 years because no one wanted to adopt an adult black cat

Pros: Good attitude. Greets all visitors at the door. Does fantastic acrobatics. Plays hard.

Cons: Rarely purrs. Bites your toes while you sleep.

Accomplishments in 2010: Still modest and unassuming as ever. Defers to Squeak, tries to play with Natalie, and leaves June bug alone (though he recently began sleeping in her bedroom). His ¾ length tail, though not new in 2010, is always worth some points. The cat of the year title was his to lose, but the expensive dental work in November was a blow to his huge lead.

Expenses: 1 vet visit, 3 teeth pulled.

Cost per pound: $47.06

June bug

Age: 11 (her vet did not think she'd live this long)

Weight: 5.5 lbs (up 1 lb since we got her)

Breed: Silvertip Persian

Background: Oh, June. She was kept in an outdoor dog crate for 8 years and badly neglected before someone turned her in to the Humane Society in fall 2009. Struggles with litter box routine.

Pros: Ridiculously cute, and much improved in the litter box area. Big purr. Cuddly, despite her bony little body. Her only two teeth are in pretty good shape.

Cons: Oh, June.

Accomplishments this year: Although June is a finicky eater, she is back to eating soft cat food (after a few weeks of eating only human baby food- read: very expensive). She now grooms herself (mainly just her face). She sleeps by our heads in bed with us every night.

Expenses: multiple vet visits, extensive dental work, daily anti-anxiety meds and antibiotics, only ate baby food for a while (see above). Sweaters. Professional grooming. Etc.

Cost per pound: $100 or more. Priceless, really

Natalie

Age: 14

Weight: 13 lbs.

Breed: Domestic long hair

Background: Disemboweled by her previous owners’ dog. Medically neglected. Borderline diabetic. Required hernia surgery including a Gore-Tex body wall, and is on a diet. She’d prefer to be the only cat in our house.

Pros: Classic beauty, good stomper, good at polishing things with her declawed paws.

Cons: Little bit of a diva complex. Does not play well with others.

Accomplishments: Natalie continues to be the largest of our cats. No expensive surgeries this year. Glowing report from the vet (who she hates). She has not eaten any of the other cats, nor has she squashed them either. She did go through a phase of wanting to go outside, but that passed. She stopped using June’s litter box.

Cost: Expensive diabetic food, but only 1 vet visit this year.

Cost per pound: $7.70

Wednesday, December 8, 2010

My Favorite Garden Tools, Part 1

Nothing will say "I love you and appreciate you" this holiday season more than a well-made garden tool. The heft of King of Spades 16” round blade spade or even a 17 lb. pencil point San Angelo bar can communicate the strength and endurance of your love and appreciation to that gardener in your life.

I've been threatening to write a post on my favorite garden tools for a while now. Actually, I guess I have been threatening to write anything for a while. Maybe because it is the gift giving season, or maybe it is because I no longer need for these tools now that it is winter. In any case, I thought I'd write about some tools I like to use. * In the spirit of full disclosure, I have not been paid or received any compensation for the following reviews. However I would really appreciate any endorsements or compensation from these fine companies!

Here are some of my favorite garden tools:

AM Leonard soil knife, my favorite all around garden tool. This is the tool I reach for most often. I use it for transplanting, weeding, and any relatively small digging job. It is very well constructed and stout. You won’t bend or break this- it will last a lifetime. It is made with stainless steel and a orange poly something handle, easy to find, and will last forever, no splinters, and does not need any care. I have used a bunch of hori horis (Japanese soil knife) and other soil knives and this is my favorite. This knife has been redesigned and it is much better than the same model I currently have. The serrations are deeper and sharper, and it even has a twine cutting notch (pretty useful). Mine are several years old and probably have decades more use in them. A close runner up is the Lesche soil knife , it looks really cool and tough with the much more aggressive serrated edge and the hand guard. I have both and I like them. They are both made in the USA, which I also appreciate.

Diggit 2 weeding tool. This tool is nearly indestructible (and comes with a lifetime warranty) , with a bright yellow vinyl handle. It is really narrow to cut through compacted soil to get the deep roots of dandelions and other plants. It is so string and stout, that I use mine to pry up or reset concrete or urbanite pavers. For weeding in a small space it is my favorite, plus it is made in the USA.

Felco #2 pruning shears. I wrote a post about these a while back. A fantastic tool- there is a reason everyone likes these.

17# pencil point San Angelo bar (hard to take a picture of it, but it looks like a bar). Here is my shout out to Texas. The one I have been using for years was a wedding present (no lie, my wife and I registered for it). Around here digging holes does not require a shovel, but rather a digging bar and your hands. My favorite tool for the job is a 72”, hexagonal-shafted, chisel point on one end, pencil point on the other end, carbon steel digging bar. A friend of mine recently dug all the holes for a fence with a screw driver and a coffee can. The coffee can was for the soil. It can be really rocky here.

Drain spades- for general digging and transplanting I use one of these (the green handled one in the picture at the top of the post, and most of mine have been bent from using them as a pry bar or something), but they are light weight and good for general use. But when the digging gets tough, the one to use is this one: The King of Spades 16” rounded blade digging spade. This is a real piece of machinery. Heavy, sharp, unbend-able, with and removable and replaceable foot pad. Although not advertised as a pry bar, you can use it for one, and I have (made in the USA).

Monday, October 4, 2010

Reverse photoperiod and fall fun

Photoperiod refers to day length (length of both light and dark periods), and it causes significant physiological responses in plants and animals. Photoperiod dictates the onset of animals' sleep, migration, reproduction, and the changing of coats or plumage. Day length signals seasonal changes in many species, and is the first cue to change fur color in snowshoe hares and it even induces estrus in many mammals. Some plants will flower only after experiencing a certain photoperiod for a certain number of days. Yet despite how intricately timed this mechanism is in animals and plants, there can be confusion. Just as a broken clock is right twice a day, the photoperiod is identical twice a year. Anyone that has spent time in the woods knows the tricks that this phenomenon will play on animals.

For example, in the fall the day length is the same as the spring (and vice versa). This is why you hear ruffed grouse drumming in the fall, as though it were the spring. In our garden, northern flickers are making their mating calls and even displaying their courtship rituals, chickadees are making their lovey-dovey pleas for a cheeseburger, and nuthatches are playing their tiny tin horns (maybe this is why the Bike Gardener thinks she is hearing nuthatches today, or maybe it is a personal thing). Many spring nesting species are checking out nest boxes. Reverse photoperiod even fools plants. Many plants that flower in the spring will also flower in the fall, like the erigerons in this post.
Reverse photo period may also partially explain a fall migration of the largescale suckers in the Clark Fork River, but I digress (their spawning migration is in the spring).

If nothing else, it is fun to say that things, often totally unrelated things, are a result of reverse photoperiodism. Give it a try in conversation this week and impress your friends.

Monday, September 27, 2010

A garden is dynamic

Its been a while since my last post, in part because I've taken some time to do some work in the garden.
A garden is never done.
From time to time it is nice to redo parts of the garden. Perhaps it is because I am never satisfied, or maybe it is just that I like gardening, but more likely it is because the garden is always in a state of change. Unlike interior decorating or architecture, plants grow and conversely they die, or becomes senescent, which sounds better sometimes.
The garden changes, and how you look at the garden changes too. Plans change, the way you use your garden changes, and your tastes and aesthetics change over time. As a result, there is always change, and a garden is dynamic. Embrace this- it s part of the fun. Plan for it, if you are good.

Here is a link to an older post of mine that will give you an idea of the continued change in our garden (Time Series and Change)

This year I put together a list of garden projects, these are always fun to make and a great reason for keeping a garden journal (or a blog).
So this is a little recap of some of those projects, but also a reminder that a garden is not static, or stuck in some level of size, growth, etc... The more plasticity you can incorporate into your garden, the more you will probably enjoy the process of gardening.

Changes:
I finally got rid of the last vestiges of lawn (see photo at the beginning of the post and below). In both cases our lawn had been reduced to a couple of patches of open space, but mainly they were used as paths and as places to gather. Frankly, neither option was a really good use for lawn. These little lawn remnant patches would typically get worn down and trampled. Also, since we had so little lawn, the lawn began to look out of place. So rather than fight it, I dug it all up, and replaced it with urbanite, hills and ultimately more native plants (here is a past post on working with urbanite). The native flowers will come from where I placed new raised beds (see blow).

I also added more raised beds to the garden for vegetables like this new garlic bed in front of the greenhouse,
Or the new onion bed in the foreground next to the grape arbor. All these beds are covered with my cat guard/ trellis system, in case you were wondering what the grids were all about. They also triple there utility as planting grids for garlic and onions since I plant all those with about 6" spacing.
The aspen grove is now decadent- but we did not loose aspen, we gained some sangs. And as aspen are wont to do, we did not actually loose any aspen, they are just in different places, and we now have more aspen, or above ground aspen, anyway.
We got a good decade out of the aspen grove, and frankly I am excited to rework it- while using the snag as a prominent feature.
Throughout these projects was the theme of adding more and more seating.

Cheap gardening.
Like that law of physics, matter is never really lost or gained nor was it lost in these projects- all the elements were just rearranged. I moved plants from one area to the next, moved compost from our compost bins into the new raised garden boxes, moved a hill from one place to another, and ultimately spent nothing, other than a trip to Home ReSource, which, by the way, is having its Grand Opening on Sat. Nov. 6th, to scavenge some urbanite from their take pile.

There are always going to be some places in the garden that just don't work, and that is also part of the fun and challenge. This summer I changed a couple of spots that I thought I fixed last year, or the year before. Some years I do nothing in the garden but enjoy it- enjoy it but secretly plan some changes. Sometimes I think my wife dreads when I say, things like "I'd like to move this or that or put a hill there or take that hill away". Again, this is all part of the fun, that is, thinking about how to change things and solve problems, not annoying my wife.

In a couple of years, the changes I made this summer, I might undo, and I look forward to it.

Monday, August 23, 2010

Native bee nesting update


A little while back a wrote how to make a house for solitary nesting bees in 5 minutes (part of my wildlife garden stuff in 5 minute series) and above is a video of the bee house I installed at the Native Plant Garden at 8th and Grant.

So, here is the update after the bee houses have been in place for about two months...

There has been a lot of activity in the last couple of weeks, and not just at my house, but at all the locations where I set them up- at the Native Plant Garden at 8th and Grant (aka the 8th Street Pocket Park) and at Home ReSource. Also the activity seemed to be shared by not just the mason bees (Osmia spp.) but also various leaf cutting bees (Megachile spp.), and even some brood parasites like the cuckoo bee (Coelioxys spp.). The cuckoo bee frequents the nest boxes because they lay their eggs in the nests of the leaf cutting bees. These were the most active bees in our backyard tonight. All are really cool.

Here is a great guide to the common bees of western Montana, with an emphasis on native solitary nesting bees by Jennifer Palladini, and it would be a great compliment to your bee house to keep a copy close by.

By the way, although it is recommended to have them face east, the ones facing south have much more bees in them (I should that this conclusion is based on a small and unequal sample size so, please, view these results with caution).

Although it seemed expected that the native bees would find the boxes in our backyard and at the Native Plant Garden at 8th and Grant, I am most excited they have taken up residence in the nest box in the native plant garden at Hom ReSource. Home ReSource in located in an industrial setting, a place with few native plants, and few gardens. Their presence in this little patch of habitat is especially gratifying.


Though I questioned the efficacy of these boxes for conservation, etc.. in my last post, they are just flat out fun to watch and a great tool for teaching and learning about our native bees. So, by all means build one and install one today. Better yet, make a few and give them as gifts (and include the bee guide).

Tuesday, August 3, 2010

Yellow evening primrose time-lapse video

A short while ago, I wrote about the yellow evening primrose (Oenethera flava) and the interesting and intricate role they play in our garden (click here for the post). Above is a time lapse video showing a bud growing over three days and then finally flowering. As I've mentioned before, these time lapse cameras are a lot of fun.

Right now, my time lapse camera is at Home ReSource to document the construction of the Garden of Giving. By the way, I'd be remiss if I didn't mention that it is not to late to donate to Home ReSource and have your name immortalized in the garden.

Wednesday, July 14, 2010

8th Street Pocket Park update and volunteer night

Join us Thursday night (7-8 pm) when we continue to landscape the 8th Street Pocket Park (at the corner of 8th and Grant). Learn about native plants, gardening, wildlife gardening and how to do it! Bring your questions, notebooks and cameras. Tasks for volunteers this week include planting grasses and flowers (in the photo below), screening topsoil, installing lawn edging, and some light weeding.
The 8th Street Pocket Park is a small neighborhood park my wife and I have been volunteering on- planning, landscaping, grant writing and maintaining for the last few years (click here for more information). This was an unused right of way (owned by the city) that was not being maintained, cared for, and had just turned into a gathering area for trash and noxious weeds. We transformed 1/2 of it n 2008, using drought tolerant native plants, and incorporated many wildlife features (see above).
In 2009 we received a grant for plants, mulch and other landscaping materials and last summer we began site preparation of phase 2- the next 1/2 of the park (see above, as the site looked in 2009). Funding for materials for this project has come from the Missoula Office of Neighborhoods, UM Natural Areas, and Montana Native Plant Society. Materials were also donated by Home Resource (like recycled lumber, fencing, lawn edging and more), and plants and bird, bat, bee houses and interpretive signs were donated by Butterfly Properties (that is, my wife and me).

This spring, I installed a fence, horseshoe court, trees, and other wildlife features (see photos below), and last Thursday with help from neighborhood volunteers we planted shrubs, and did some weeding.
Below you can see a standing cottonwood snag (dead tree trunk) I planted and a bat box I made.
We hope to see you there. Wear sturdy shoes, bring gloves (always a nice idea but not mandatory) and your favorite planting tool. We'll have tools too. If you want more information, contact Marilyn at marler@bigsky.net

Flicker fledging has begun!

Here are just a couple of pictures and a short video of the fledging progress. Once they fledge, I'll post some more information and pictures, as well as some videos, including some time lapse videos of the fledging. Above is a young male contemplating fledging and below is a female doing the same.
Although we have flickers, nuthatches and chickadees nest in our yard almost every year, the interesting thing this year was the addition of nest box cameras (see photo below).

Click here to watch the nestlings inside of the nest box, if they have already fledged, you can still watch videos of the whole process on Ustream. I captured videos almost every day to document the process.
And here is a not very good quality video I took from inside my house but it shows what is happening outside the box for those that have been watching the flickers online from inside.


Stay tuned for more.

Friday, July 9, 2010

My new favorite garden tool- a time lapse camera


My wife recently surprised me with an early birthday present- a time-lapse, outdoor, waterproof camera for the garden (Brinno Gardenwatch Camera). If you recall, last year she got me another garden camera- a couple of nest box cams. Those have been so much fun and educational, and by the end of this week, our flickers will be fledging so check out the nest camera.

I am totally captivated by this new camera, though. And astounded by all the applications. Suddenly I have so many uses for this one camera that I will have to buy more. I was originally going to write about what garden tools I like and why (I’ve gotten a few questions about that), and I will get to a post about that shortly, but right now, I have to write about this time lapse camera.

This time lapse camera is very easy to use and seems really durable. Right out of the box, it is easy to set up and start taking videos.

At this point, I must digress and reveal that I am in no way benefiting from this review- it is not a paid endorsement, nor did I receive one of these for free to demo or anything- though I do wish someone would contact me about demos, tool reviews or tool trials or something that my other blogging peers seem to get!

Anyway it is really easy to use and I look forward to lots of applications like watching evening primroses, bitterroots (Lewisii rediviva ) flowering, to large long-term changes in our garden, to watching animal heads decompose, to planting and building projects in the garden. I would love to set up one to watch the entire backyard (we have a small yard) for an entire year. The possibilities are endless.

It is easily adjustable and simple to program the camera to take pictures on set intervals from 1 minute on up, and you can even set custom time intervals. You can zoom in to focus in on a single flower or zoom out to look at a landscape. The camera takes remarkably good pictures and has a forgiving depth of field. The camera and housing seem really well built, durable and waterproof, so I suspect I will get many years of use from one. It comes with a 2 GB USB flash drive and I suspect you could plug a much larger one in for huge files or very long term videos. The camera records the videos on the flash drive and you can easily load it to your computer for viewing (without any special software) and editing (with the software provided).

My only complaint or suggestion is that the camera has a photo sensitive shut off so it does not take pictures in the dark, but that is a time I’d like to see what is going on, especially with the evening primroses (see below). It would be great if it came with an infrared camera or option to capture nighttime viewing, like the nest box cameras I have.

At the beginning of the post is a short clip of a white evening primrose (Oenothera cespitosa) (my first video). I recently wrote a post about its cousin and a neighbor in our garden the yellow evening primrose (O. flava). The video would have been better but a neighboring horsemint (Mondara fistulosa) hogged the camera! Nevertheless you can still see the primrose flower's bloom, and the flowers fade, and all that happens with a plant over the course of a couple of days as it tracks the sun across the sky.


Above was my next video, a test, aimed at the flicker nest box (see below for how I mounted it on the side of our house aimed at the flicker box). After I recorded this video I readjusted the camera, zoomed in and changed the record interval from 5 min- 1 minute. When the flickers fledge, I will upload a video with all the action. Now that it is adjusted, it is capturing images of their impending fledging (fledging is scheduled for around July 10).


So exciting. I’ll need to get some more.

Updated July 10:

Here is a better (and shorter) time lapse video of the nest box:


Tuesday, July 6, 2010

yarrow is not a four letter word

Yarrow (Achillea spp.) has been coming up a lot lately in garden conversations and I wanted to set the record straight. Is it an annoying invader, or a garden-worthy native? In each case that someone described an annoying invasive yarrow, the plant in question turns out to be not our native white yarrow (A. millefolium) but rather a non-native species or cultivated variety of yarrow.

Yarrow is a native plant that can be used quite well in a variety of garden situations ranging from xeriscape prairies to conventional applications. The native yarrow is an example of a plant that you do not need to use anything but the native. Using a variety bred for showiness or color could get you in trouble (unless you enjoy endless weeding).

Our native yarrow is beautiful, durable, drought tolerant, fragrant and offers year long interest with its beautiful seed heads and adds an important architectural element in the garden if left uncut for the winter. The flowers are also great in cut flower arrangements.

We use yarrow in our own garden landscapes and encourage its use by our clients. It is easy to grow, liked by butterflies (it offers a nice landing pad- see the photo at the beginning of the post), and very versatile. Aesthetically, the native yarrow is the right color for semi-arid western Montana. Its leaves have a beautiful soft and feathery texture and have the silver-grey cast that is common to so many prairie plants. This grayish-blue color is an adaptation to the sunny and dry prairie conditions: it reflects sun.

Over the last couple of weeks people have been surprised that we planted yarrow at the neighborhood park we have been landscaping, at the Home ReSource landscaping project we designed and installed, and a client of ours, wanted to know how to control the “native” yarrow he planted. In the case of the client- the yarrow he thought was native was actually a pink flowered variety, and in other cases, it is always an escaped lawn weed that takes over, giving our native beauty a bad name.

We use yarrow in a a variety of settings in our garden- ranging from naturalistic- in our front yard prairie where there are individual plants scattered (see the white flowers in the photo below ),

and we have grouped several plants together in our backyard to create a wash of colors that compliment the purple clarkia, and fleabanes- see below.Yarrow is a common plant in garden centers and in the landscaping industry, and it represents a great example of why you need to know what you are looking for if you are shopping for native plants. Although we do have a native yarrow, most of what is sold is not native. Yellow flowers, pink flowers, and even white flowers adorn many commercially available yarrow. But most behave much differently than our own, native plant. Many non-native yarrow will turn weedy if watered, and even native yarrow will thrive with water and will spread- so if you don’t want it to spread, apply neglect, and you’ll be rewarded with a prosperous, beautiful, native plant.

Wednesday, June 23, 2010

Build a Mason Bee House in 5 Minutes


It is National Pollinator Week, and I figured a way to commemorate this was to build a mason bee nest box (more on this in a little bit). For Missoulians, a great way to celebrate this is at Thursday night's native plant sale with information about pollinators- including mason bees.

Unlike non-native honey bees that nest in hives with many others, native mason bees are solitary and each female builds her own nest. I think it's cute that although these are "solitary" bees they all nest right next to each other in communities, but evidently they have it worked out so they maintain their own identity. Anyway, they nest in cavities in logs, snags and decadent trees from woodpecker or wood boring insect holes. They also nest in hollow reeds and canes (like raspberries). As a result of the loss of native plants, removal of dead or dying trees, etc... many suspect that they are nesting site limited and by providing artificial nest sites (houses) we can help their populations.

Mason bee houses have been around for a while but I’ve been reluctant to build a house for them. Maybe it’s because I liken these houses to butterfly houses (that don’t work and cater toward yellow jackets). Or maybe it was because I thought by providing snags in the yard and or borer hole-filled aspen; we were providing more natural places for mason or other solitary nesting bees. So I did some research and in addition to a surprising amount of literature on the topic, I came across a great literature review that evaluated the efficacy of intervention (people trying to help out bees) on bee conservation: Bee Conservation: evidence for the effects of interventions Lynn V. Dicks, David A. Showler & William J. Sutherland Based on evidence captured at www.conservationevidence.com.

Here is a brief summary:
Yes, mason bees do use the nest boxes (so they have a leg up on butterfly houses). However, in one study in California, introduced European earwigs and introduced European leafcutter bee species used the boxes, and in one instance these introduced species were more common in the houses than native bees.

What about plastic nest cavities or using plastic straws?
Nest boxes with plastic‐lined, plastic or paper tubes were worse for bees than houses with simpled bored wood nest holes. The main reason was mold and even increases rates of parasitism. This is not surprising that just drilling out wood holes more naturally mimics a natural hole in wood. Don’t use plastic or straws.

But the big question: Does this help populations on a larger scale, that is does it boost local populations? In reviewing several studies, the answer is unfortunately not really. The results were mixed, in some studies it seemed to help for a while in other studies there did not seem to be an effect. Kind of disappointing.
Despite the less than exciting results, I decided to go ahead and build some and see for myself. If nothing else, they are pretty fun to have in the garden and I am looking forward to checking on them and learning more about mason bees. But really, the thing that I think put me over the edge is I learned that these make great flicker feeders. I figured this out inadvertently since all the descriptions I read about making mason bee houses involved a phrase like “cover with chicken wire to keep birds out”. At first I was puzzled, since I knew no birds could get into the 5/16” diameter hole. But then I figured out what keeping birds out really meant.
This is the second installment of building things for your wildlife garden in 5 minutes (click here for the first- a suet feeder). This bee house is a great project to do with kids or just with the kid inside yourself. This is also a great project to make out of scraps you have on hand already, or a great use for recycled materials commonly found at Home ReSource.

Materials:
  • 1/4” peg board*
  • 4"x4"x 12” or so
  • 1"x6"x18”*
  • 5/16” drill bit
  • Drill
  • Saw
  • Screws
  • clamps*

*optional

Step one
Cut 4x4 to size, cut the top at an angle to help shed water
Step 2
Use pegboard as a template for holes, align on 4x4, and drill 5/16” holes, about 3" deep (if you are using a 4x4- just don't drill all the way through the wood). The bees really don’t care if the holes are nicely arranged, and really you could skip this step of putting on a template, but I think it looks nicer.
Now, if you want, you are done. But, there is more if you are interested.

Step 3
Install top and back with screws- having the back on this allow for easy mounting on walls or posts. Now, you are done (again). All that is left is to install, and here are some tips:
  • Place 3-5 feet off the ground
  • Place east or south-east facing in a place where you can easily observe it
  • East is best so the little fellas can get all warmed up quickly by the morning sun
  • Once you install them, don’t move them until the winter
  • You can place several in various locations in your yard or give to neighbors for their yards
  • Try to place near a source of mud

Tuesday, June 22, 2010

Native Plant Sale and Insect Workshop!

Do you want skippers in your garden (like the one above)? Now is your change to buy their larval host plant- the prairie Junegrass (Koeleria macrantha ) at a fantastic native plant sale and insect workshop hosted by UM and the Montana Natural History Center.

Join a host of local experts to learn about gardening to attract pollinators, making mason bee nesting boxes, identifying common garden insects and learning to separate the harmful insects from the helpful.

The site for this workshop is the Nature Adventure Garden located out at Fort Missoula, which includes a 2-acre demonstration area of native wildflowers, trees and shrubs. It’s a perfect spot for pollinator observation as well as learning how to use native landscaping to attract pollinators!

Date: Thursday, June 24th
Time: 5:30 pm – 7:30 pm
Cost: $5 suggested donation.
Location: Nature Adventure Garden at Fort Missoula
Call 327-0405 for more information.

Teachers: 2 OPI credits available.

Monday, June 14, 2010

A new visitor to the garden

This morning I found a raccoon in the garden, and I'm not sure how I feel about it.
I consider raccoons a class 3 non-native species; this is according to my own little classification system (European starlings are a class 1, for example). Raccoons are not native to most of Montana, but are now widely spread across the state (this I have personally confirmed with roadkill observations). They are native to a small area in extreme eastern Montana, but they were never really common there. Their range has expanded throughout the state (and in the northern Rockies) in the last 50 years as a result of urban- and suburban-ization. Development, tree planting and food subsidies (garbage, pet food, and intentional feeding) has facilitated their range expansion. Raccoons are native to the US, and they have not been introduced by people (as far as I know), but since they are not native they have the ability to disrupt indigenous plant and animal communities and compete with other native animals.
They are similar in many ways to other non-natives we have in Montana, like Eastern and gray squirrels and house finches. All three of these are native to the US but not native to Montana, and all have been transported and introduced outside their native range by people. Squirrels have become a conservation issue and are really a problem (read more here , for example). On the other hand, house finches, which are native to the south western US but now occur all over the west, are merely a nuisance. I'm not aware of them being a conservation issue (as a little aside, since we stopped feeding sunflower seeds to birds, the house finches are uncommon in our yard).
So, I am not sure what to think of the new visitor. I will do some research and observation, and keep an eye the the little fellow for now.

Saturday, June 12, 2010

The ecology of yellow evening primrose in our backyard


There have been several great blog posts about pollinator plants and pollinator gardening, calling attention to both the good and the bad. (the latter post very articulately describes the problems with pollinator gardens). A while back I wrote about my disdain for the trend that was pollinator gardening. OK, disdain is way too strong, but you get the idea.

In honor of national pollinator week (June 21- 27), Kelly Senser from the National Wildlife Federation compiled favorite pollinator plants from gardeners from across the country (click here for the story). In this, I wrote about one of my favorite plants in our garden, the yellow evening primrose, (Oenethera flava). Tonight my wife and I watched as one of our yellow evening primroses opened- click here for a video of it happening (the action really picks up at 55 seconds).
Though the flower is gorgeous, large and showy, the real reason I like it so much is it offers a wonderful microcosm of wildlife gardening. In short, the primrose is moth pollinated, because it flowers at night. That is pretty cool in an of itself, and probably not that typical in the run of the mill pollinator garden. However, the neat thing is this is the host plant for a moth that does not feed on its nectar, since it is a daytime flyer: the five- line Sphinx moth, also known as a hummingbird moth. And where this whole story gets more interesting, and typifies the intricate plant/ insect relation ship is that even though the eggs and larvae are tied to the primrose, it needs something else to complete its life cycle- soft duff or sawdust.

In our yard it finds fresh, loose sawdust at the base of our aspen (Populus tremuloides)trees. The reason for this accumulation of saw dust is that the trees are invaded by the larvae of a long horned beetle- the aspen borer (Saperda calcarata). As the larvae tunnel through the aspen they force out sawdust that collects around the base. Also, as a defence, the aspen pushes sap out these wounds. The sap is a critical food source in the early spring for many species of butterflies that overwinter as adults like the mourning cloak or Lourquin's admiral (shown below feeding ion the sap of an aspen).
So, from this one example you can see how interesting and intimate the association of plants and pollinators are. Furthermore, you can also tell how unrelated some of these plants and animals are. Provide native species, and diverse assemblages and you will be rewarded with much more productive "pollinator" gardens than if you tried to plant a garden for pollinators.

Friday, June 4, 2010

Nesting, nestling and fledging update

There is a lot going on with nesting birds in our garden. We have northern flickers, black-capped chickadee, and red-breastered nuthatches in various stages of nesting and fledging in nest boxes in our small backyard. Here is a breif run down on the actvity....

Black- capped chickadees

The chickadees should fledge any time now- they are ready to go but have probably been delayed by this rain. By the way, thank goodness for the rain!

If you haven't done so already check out the inside of the nest box with our streaming nest camera. But you'd better hurry because they are about to fledge. Click here to go inside the nest box.

At the beginning of this posts is a short video my wife took of the outside of the box and one of the adults feeding the young. For those that only know the chickadees from the inside of the nest box, this view might be interesting.

One thing I am really excited about is that we will be able to capture the mysterious second clutch this year on camera. every year, the chickadees have a second clutch, even after a typically very fruitful first clutch. The second clutch is usually smaller, and takes less time to fledge. It has aways appeared that the young from the first clutch help in raising (or at least with the feeding), the second clutch. Hopefully, though we'll be able to learn a little more of what is going on. It is not really common that chickadees have two clutches, so I am excited to learn more.

Red-breasted nuthatches

These little fellas have been a bit overlooked this year, I am sad to say. Not that they care, but theirs is the only box in which we did not install a nest cam. As a result, we have been so focused on the chickadees and the flicker business, that these little guys have been almost ignored (not really, but relatively). Anyway, they should be fledging any day now, too, but without all the fanfare. One interesting thing to note with these nuthatches, is that there are nuthatches nesting in the nest box I installed at the 8th Street Pocket Park, which is just a block away. Every so often these two nuthatch factions defend their little territories, which is kind of neat.

Northern flickers

Wow, they have had an eventful spring. Here is a little story of their spring...
  • They excavated out nest box
  • They also excavated a cavity in a silver maple in front of my neighbors house
  • They laid eggs in the cavity in the maple
  • European starlings evicted them from their nest
  • The starlings are nesting in the tree
  • The flickers left the area
  • Last weekend the flickers returned to the nest box, and as of yesterday (June 3)have laid at least 2 eggs (in the photo below- kind of poor qualiy but it is a video capture).


I hope they can raise a clutch- it is getting late for them.

Once the chickadees fledge we will switch to the flickercam for nest box viewing. Exciting.

Friday, May 28, 2010

Native Plant Landscaping talk wrap-up

Thanks to Liz Lodman and Barb Furlong of Montana Fish, Wildlife and Parks' Becoming an Outdoor Woman (BOW) program for hosting last week's native plant gardening workshop. BOW is a wonderful program, and if you haven't taken a class you should. And if you have, let FWP know how much you liked it. Anyway, thanks to both for organizing such a wonderful Native Plant Gardening Workshop. It was a fantastic turnout.

Many of you had garden design questions and specific plant questions. I did not mention it at the talk, but my wife and I have a garden coaching and consultation business, Butterfly Properties, LLC, specializing in sustainable garden design- native plant landscapes and gardens for wildlife,
Click here to download the list of easy to grow versatile and diverse native plants.
And here is a link to download my list of deer resistant native plants.

Here are some past blog posts that might be helpful:

Below are some of the books and references I talked about in the class:
  • The Magic of Montana Native Plants: A Gardeners Guide to Growing over 150 Species from Seed- Sheila Morrison
  • Bringing Nature Home- Douglas Tallamy
  • Shrink Your Lawn- Evelyn Hadden
  • Noah's Garden: Restoring the Ecology of Our Own Backyards- Sara Stein
  • Paradise by Design, Native Plants and the New American Landscape- Kathryn Phillips
  • The Forgotten Pollinators- Buchmann, Nabhan, and Mirocha
  • Landscaping Ideas of Jays- Judith Larner Lowry
  • Gardening with a Wild Heart -Judith Larner Lowry
Thanks again, and I hope you all enjoyed the workshop.

Sunday, May 9, 2010

The flickers are not nesting in the garden...

The flickers are not nesting in the garden...and I couldn't be happier. A puzzling statement to be sure, so let me explain...

We began about 10 years ago with nest box for northern flickers. These common, primary cavity nesters are facing many problems from loss of nesting habitat to pressures from invasive species (see here). In order to address the first issue we set up a nest box. This was very successful and effective, and based on how quickly they found the box and occupied it, it is obvious they are looking for, and are limited by, places to nest.

In front of my neighbor's house are decadent silver maples (see above), that you'd think would offer great nesting habitat for flickers, and they do, but unfortunately the cavities get occupied by squirrels instead, and have been for the 10 years we've lived beside them.

But it appears that this year the flickers will finally be nesting in one of these decadent trees and I couldn't be happier.
They did excavate our nest box (see photo at the top of the post), and I thought they were going to nest in it. But at the same time, they also excavated a cavity about 30' up one of the silver maples (photo above, arrow acknowledgement: Bike Garden), perhaps our nest box was a back-up for what inevitably happened when flickers tried to nest in the maples- squirrels would occupy the cavity. But maybe not this year.

Unfortunately wildlife gardening in an urban- or sub-urban setting is not just about planting the right plants and putting up nest boxes, unfortunately it is really about introduced pest management. The primary exotic pests here are starlings, house sparrow and squirrels. Controlling pests is not the most glamorous part of having a wildlife garden, but it is perhaps the most important.

In order to combat these invasive species, we have done several things- making the garden less hospitable for them is the first step , but then there is also control, or killing (click here for more information). As far as making the garden less hospitable, that starts with feeders and nest boxes (click here for information about lessening bird feeders), and native plant landscaping (see virtually any post on my blog for this thought!). Both feeders and nest boxes need to be designed for native birds, so no perches, only food they eat, and really very few feeders, and only seasonal ones (click here and here for more information).

Since we stopped feeding with sunflower seeds, we have seen the number of pests decline dramatically in the garden - including US native, but not Montana native, house finches, which essentially disappeared from the yard. In the summer, spring and fall, there is so much natural food, much of which we have planted, feeding is not important and mainly attracts unwanted, or invasive birds and animals, and it also causes unnatural high congregations of birds, that make them susceptible to other pests, like cats (click here for my thoughts on this).

Secondly we only use nest boxes that are appropriate for native species that we are likely to attract, not bluebird boxes for example (read more here).

Third there is control or killing squirrels. In our garden we have a trap set up, and any squirrel I trap, I kill. This started several years ago, and I went from over 200 squirrels/ year down to fewer than 20 last year and this year will be even fewer. As a result, we have seen birds use the garden much more often and differently than when squirrels patrolled the grounds. And most importantly, birds like northern flickers might just nest in natural places now. Like I said, this is the first year that I am thrilled the flickers will not nest in our garden- perhaps the greatest accomplishment in our wildlife garden so far.

Thursday, May 6, 2010

Native plant garden workshop wrap-up and plant sale announcement

Thanks to the Montana Natural History Center for hosting the native plant gardening workshop- I hope everyone was inspired to start gardening.
Here are links to blog posts of mine that we discussed:

You can search for any topic on the blog- make yourself at home on the blog and let me know if you have any questions.

Also, here is some exciting news: Native Plant Sale!

Fort Missoula Native Plant Garden's Annual Spring Spruce-up and Native Plant Sale!

Thursday May 13, 5:00-8:00 pm

  • Enjoy some refreshments and meet some good people
  • Learn about gardening for wildlife and sustainability while helping get the Teaching Gardens ready for summer programs
  • Bargain-priced native wildflowers, grasses and shrubs for sale; all proceeds directly benefit local restoration and education programs.
  • If you feel like volunteering we’ll be pulling some weeds and spreading mulch. Guided and self tours of the garden available.

Directions: Enter Fort Missoula via Old Fort Road and drive past Community Hospital.At the stop sign, go STRAIGHT.The road will make a T on Officer’s Row. Turn LEFT.Continue till the pavement ends. The garden is in front and to the left on the gravel drive-you'll see our white classroom.

RSVP to Leah Grunzke if you plan on attending or need more info. Hope to see you there!

Sunday, May 2, 2010

Nesting and Nest Box Camera Update

This was an exciting weekend for the nest box cameras. All three of our nest boxes have birds- northern flickers, black-capped chickadees, and red-breasted nuthatches. New this year, the flicker and chickadee boxes have nest cameras, including streaming the chickadee nest cam! The flicker cam will be streaming next.
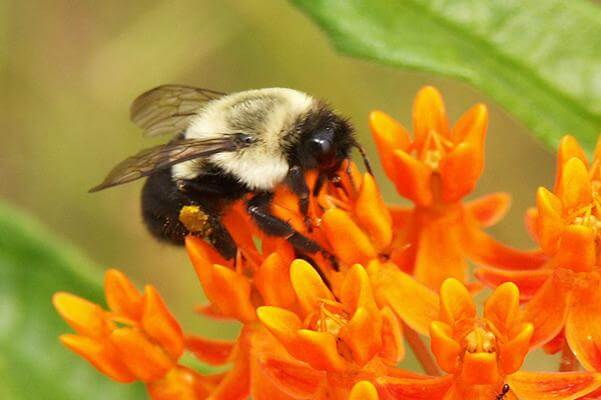
 Here is the link to the streaming video of the chickadee box, though not much is going on during the day, but in the evenings and mornings a lot happens.

I installed the cameras and then packed the boxes with sawdust (click here for a description). This weekend, now that the boxes had been excavated, my wife and I focused the lenses and adjusted the camera angles, though based on the quality of the chickadee camera's video, we might need to do some more lens adjustments.

The photo above shows the chickadee nest box, camera, and the freshly excavated cavity filled with moss and squirrel fur. Based on the female's nest construction (see the video below), it looks like she will be laying eggs soon, then the real excitement begins.

Here is link a short video taken this evening of the female burrowing in to the nesting material to carefully create a pocket for the eggs.