Sunday, May 31, 2009

No army can withstand the strength of an idea whose time has come: Greenhouse construction update No. 6:

That quote from Victor Hugo in the post title is a reference to succumbing to my wife's desire to move into the greenhouse before it is finished- I have held her back long enough. Although I'd just as soon keep building and fiddling with the greenhouse all summer, my wife wants to use it to grow some plants (the nerve of her!). I did build the greenhouse for her, after all, so yesterday she planted a bunch of peppers, eggplants, basil, and tomatoes we've been nursing along since January in the propagation chamber in our basement.
Although the greenhouse is not finished, it is in a usable state. I still have to add shelving to the north wall, find a small (30- 36") ceiling fan, run power out to the greenhouse and make all the electrical terminations- these will probably wait a while.

Like I have mentioned, apart from building a greenhouse that was energy efficient, met our needs for size and style, one of my main goals has been to build the greenhouse with reused or recycled materials as much as possible. This has been a fun and rewarding challenge. Although the cost savings have been substantial, the real reason for me to use recycled materials comes from reducing waste and reusing materials.
As far as style I wanted the greenhouse to be aesthetically pleasing and to honor the architecture and age of our house. Though our house is not really architecturally significant- a little house built in the 1940's, I tried to match many of the details. Also, I strongly believe that when you use recycled materials, they should not necessarily look like recycled materials (read: not look like junk).
Here is a list of the items I bought used or recycled, and those that I bought new. You can see that not only were most of the materials were reused, but the incredible diversity of used materials out there. I could not have completed this project without a store like Home Resource, though.

Recycled items

  • Framing materials:2x4, 2x6, ½” CDX plywood sheathing, 7/16” OSB, door jamb material,
  • Insulation:Rigid insulation for floor, fiberglass batt insulation, foam sill plate seal
  • Wall materials: green board moisture resistant sheetrock, metal exposed edging, drywall tape
  • Roofing: Delta rib galvanized metal roofing, roofing felt, ridge cap, flashing, downspout, gutter drip edge, concrete blocks (for rain barrel, olive barrel (rain barrel)
  • Finishing materials: Exterior semi gloss paint, drywall primer, exterior trim (primed), exterior fascia (primed), 100% silicone caulk, latex caulk, construction adhesive, window and door casings, baseboard mouldings, misc. trim
  • Door, windows and flooring: Windows, door, brick for floor, glass for repairing broken panes, window hardware (hinges and closing mechanisms), door hardware, sliding door hardware
  • Interior: Sink and sink base (potting bench), faucet, wire shelving, shelving brackets and standards, stair edge molding, threshold, weather stripping, garage door weather stripping, 2 x 6 redwood for raised bed, 1930's ice cream parlor chair

  • Electrical: lighting fixtures (pendants and light over sink), attic exhaust fan with thermostat, 16” louver exhaust vent, electrical boxes (2x4 and 4x4), 15 amp receptacles, GFCI receptacles, 1 way wall switches, waterproof outlet covers, electrical nailing protector plates, 12/2 cable

Items purchased new

  • Framing materials: Pressure treated 4x6x 12, landscape fabric, 2x8x12’ for ridge, framing lumber (2x4’s Good Wood from Home Resource), misc. hardware
  • Roofing: Gutter, elbows, caulk
  • Wall materials: joint compound, drywall tape, sheet rock (damaged)
  • Finishing materials: Paint, primer
  • Doors, windows, flooring: Sliding door hardware, solar window and louver openers , 12” louver intake vent
  • Electrical: 12/2 cable

Tuesday, May 26, 2009

Front Yard Mini Makeover


Here is a brief update of a project I completed earlier this spring- a small makeover to our front yard prairie, and a couple of pictures of what is flowering now (above is sticky geranium, Geranium viscosissimum, this is easy to grow, and quick to flower- unlike the species pictured at the end of the post) .

I moved the front path (taking my own advice), added a hill, and added some interpretive signs. The whole point was to correct some design shortcomings and embrace the public-ness of our front yard. This project was also a great opportunity to eradicate some weeds that have been difficult to control (Kentucky bluegrass, Poa pratensis , in particular), by digging up a couple of big sections.

All the plants we installed in the new area came from other places in our yard. I have a lot of fun digging up plants from our yard that are volunteers in the cracks in the sidewalk and other places, growing them in our nursery for a couple of weeks and planting them elsewhere int he yard. Most of these plants can from the area that our greenhouse now occupies.

Below is a picture of death camas (Zigadenus venenosus), a pretty severe sounding name. I hear it is not really deadly, but it will just make you sick, but I am not going to try it. It is a really neat little plant, and looks a lot like a tiny bear grass (Xerophyllum tenax). It is really easy to grow (provided you can get the bulbs). We initially got ours from some plant salvages (plants we rescued from a development in Missoula), but since them, they have seeded well and we have a lot of volunteers.

As far as design elements, our front path has always annoyed me- a straight line leading right to the door. Similar to the back yard, I broke up the concrete and rearranged it to a curving and wider, more inviting path.

Adding the hill added topography and some visual interest, and also helped to obscure the front entrance a little. This hill also provides a nice place to showcase 30 or so bitterroots (Lewisia rediviva) that I transplanted from our backyard when I dug up plants to install the greenhouse.

Below is a (I think- my wife might correct me) silky lupine (Lupinus sericeus), and in the background is arrowleaf balsamroot (Balsamorhiza sagittata). Both are easy to grow, but as I mentioned here you need patience 4-7 years before that flower, and don't try to transplant them- their taproots are huge!
Since our front yard is a marked departure from the typical turf grass monoculture and token specimen trees so familiar to the urban/ suburban landscape, the addition of interpretive signs helps to explain what our landscape goals are. In the past, we have had signs that identify plants and signify this as a backyard wildlife habitat, but these new signs go one step further and explain Missoula prairies, wildlife gardening and why we do not have a lawn.
Below are two pictures of our front yard prairie, the top one is before (May 2005) and the bottom one is after (May 2009) this little makeover project. Not a huge change, but I think it is substantially better. I really enjoy small changes and rearranging elements in the landscape.

Monday, May 25, 2009

Greenhouse construction update No. 5

It was a busy weekend. Since the last construction update, I completed the exterior and began finishing the sheetrock. On the exterior, I installed the roof, gutter, rain barrel, painted, and put up a trellis for an orange honeysuckle (Lonicera ciliosa) or blue clematis (Clematis columbiana)- see photo below of the north side. Inside, and put up the sheetrock, and applied tape and the first coat of joint compound.

I still have to hang the door (and finish painting it), put on two more coats of joint compound, and prime and paint the walls. Although at that point it won't be finished, it will be to a point where we can start using it. We have a lot of peppers, tomatoes, basil and eggplants we have been saving to put in the greenhouse (we did plant a lot of them in our outside raised beds).

Below you can see the track for the sliding door. I decided on a sliding door to save space, but it will not seal as well as a conventional hinged door, though I am going to try to use a garage door seal and various weather stripping components to get a tight seal. I am also going to install a screen/ storm door on the inside of the greenhouse, mainly to use in the winter. I haven't found the perfect one yet (I am looking for a nice 12-15 pane storm door to match the door of the greenhouse), but I keep checking back at Home Resource. It is the kind of thing I saw so frequently there when I was not in the market for one.

One thing I did not anticipate was how much the greenhouse would change the part of our yard to the north of the greenhouse. Installing the greenhouse lead to cascading trophic-level effects on our landscape. OK, not really, but I like saying that phrase. It did lead to garden design cascades though, see my solution and before and after pictures below.
Prior to the greenhouse being in place, I was trying to make this room (our dining room) more shady and intimate, by planting a screen of red osier dogwood (Cornus stolonifera) serviceberry (Amelanchier alnifolia) and woodland plants to grow in the shade. The greenhouse quickly solved the shade and privacy challenge and we have some fantastic, instant shade.
However, the interesting part came with the use of space. Suddenly we did not have to devote as much space to the shrubs and trees for the same effect of privacy, and the space that was left felt much bigger. But as a result there was a lot of "unused" or "wasted" space. I toiled with this design problem for a few days and tried a couple of remedies, and yesterday rearranged the garden room (you can see the after picture below and the before picture at the bottom). By moving a couple of hills, creating a path, moving some plants around, rearranging the furniture and a lot of tree pruning, I created a more comfortable, interesting and intimate dining room. The path (on the left in the photo above) does go around to the front of the greenhouse, but it is more a of design element that suggests more depth, space and creates some intrigue. Like all paths it directs your eye and helps you move through the landscape and leads to an active interaction with the landscape.
Conversely, in the picture below, taken before I installed the greenhouse, without a path leading your eye to the left, it is a flat scene, with no depth. Your eye just stops at the table and chairs. Same space, same furniture, but a much less interesting and dynamic composition (I think).
I am really happy with this change, but the most important lesson I think is that change is possible- don't be intimidated, you can move plants and rearrange elements in your garden a lot easier than moving walls in your house. I really enjoy rearranging things in the garden and trying something new. It is free and can be really gratifying and spatially satisfying. Anything can be undone and redone in the garden, it just takes some work, and time, but that work is really the fun part or gardening (to me).

Tuesday, May 19, 2009

Gardening for Wildlife in Montana Outdoors Magazine

In this month's Montana Outdoors magazine, there is a story about gardening for wildlife, birds in particular. Although the author's chose to focus on "birdscaping", rather than more encompassing "wildlife gardening", the story promotes gardening with native plants for wildlife. Click here to download a reprint of the article. If you are new to Montana Outdoors, it is a wonderful magazine featuring wildlife and their habitats from Montana. The bi-monthly publication of Montana Fish, Wildlife & Parks promotes the conservation and sustainable use of Montana's fish, wildlife, and state parks, and includes the latest news on management, conservation issues, and endangered species. Especially nice is the annual photo edition in January featuring some of the best outdoor photography in the country.

Saturday, May 16, 2009

Greenhouse construction update No. 4

The greenhouse is starting to take shape. Here are a few pictures from today. There is still a lot left to do, but it is nice to see the progress. These are not the final colors (except the white window sashes)- since this is made from re-used material, all the trim pieces and siding are a mix of colors.
Tomorrow I might work on the north roof, and finishing the some exterior trim work. Then it will be a lot of interior work- insulation and sheet rock, then painting inside and out.

Above is a view from inside the greenhouse the floor on the left side is open and there will be a raised bed for planting.

Friday, May 15, 2009

A good year for arrowleaf balsamroot in our yard: thoughts on plant slection for your prairie


It is a good year for arrowleaf balsamroot (Balsamorhiza sagittata) in our little front yard prairie. This year four of our plants are flowering- the most ever, and the ones that are flowering have many blooms. The arrowleaf balsamroot is the staple of spring and early summer on the hills, open Ponderosa pine forests, and prairies of Montana. This is such a common, large, long- lived and showy flower, that you would think it would be common in home gardens, but it is not for a couple of good reasons.

The arrowleaf balsamroot, is long-lived and has a huge taproot. The tap root may get to 4" in diameter and over eight feet deep! This taproot allows it to tolerate severe drought, harsh winters, fire and grazing (by cattle and game animals).
However, because of this taproot it is very difficult to transplant- not impossible, but it is really not worth trying (especially from plants in the wild). The good news, sort of (keep reading), is that it can be grown pretty well from seed, but you need patience if you want to see the big showy flowers. Typically around here it takes about 7 years for a seedling to flower. I have read that in some conditions it might be as few as 5, though.

This spring I was delighted to see that we have about a dozen or so volunteers (see picture below), so in about 2015, look for our yard to be awash in balsamroot.

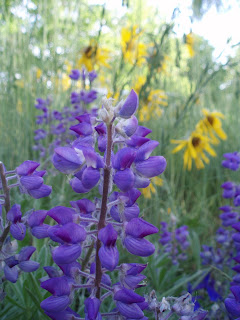
Lupine species (including Lupinus argenteus, and L. sericeus ) share many of the same traits as balsamroot: long-lived, beautiful, common, showy, and nearly impossible to transplant. Again, they are very easy to grow from seed, but it, too, does not flower for 4 or 5 years. Also, our experience is that even though getting seeds started is easy, survivorship until flowering is low.

Lupines and balsamroot require your patience and planning. Both are great for your garden, but they might not be the best choice when starting your native plant garden (certainly don't try to transplant ones from the wild). On the other hand, maybe you should get started on these first. If you are even remotely thinking about a native prairie, go out and plant a balsamroot seed today. But make sure it is in the perfect spot, because you can't move it!

Sunday, May 10, 2009

Greenhouse Construction Update No. 3

Here are a couple of pictures of the greenhouse (the picture above is the south side and the picture below is the north side). I finished the framing today, and I went to Home Resource and got some plywood sheathing and 15lb roofing felt. It is amazing the stuff you will find there. The nice thing is the plywood is reused and I only had to buy 25' of the roofing paper (as opposed to buying an entire 144' roll). So, in a few minites I'll sheath the north side of the roof and cover it with paper. Then I guess I can start putting in some windows- at least the ones on the south side of the roof. I have been really looking forward to installing the windows, and you can see one at the bottom left (north west corner), where I set one sash in place.

Saturday, May 9, 2009

Garden design and wildlife gardening books

I taught a workshop yesterday at the Montana Natural History Center on Native Plant Landscaping, Wildlife Gardening and Garden Design. Preparing for this class got me to re read many books and articles I have had on the shelf and have been thinking about since writing this last post about planning.

Below are some of my favorite books on garden design and wildlife gardening. Interestingly, my favorite books on garden design are actually about interior design and architecture.

If you were in the class today- these the the references from my last slide:

Bringing Nature Home- Douglas Tallamy

The Not So Big House series- Sarah Susankah
- Examples Creating the Not So Big House, Inside the Not So Big House, and all the others

Fine Gardening Design Guides
–Example Gardening in Small Spaces

Best of Fine Gardening Series
–Example Garden Rooms

Shrink Your Lawn- Evelyn Hadden

Noah's Garden: Restoring the Ecology of Our Own Backyards- Sara Stein

Paradise by Design, Native Plants and the New American Landscape- Kathryn Phillips

The Forgotten Pollinators- Buchmann, Nabhan, and Mirocha

Landscaping Ideas of Jays- Judith Larner Lowry

Gardening with a Wild Heart -Judith Larner Lowry

Thursday, May 7, 2009

Plant a standing snag for wildlife

Standing snags (dead trees) are a common structural component in forests and riparian areas. Their importance in the wild is well known, studied and understood. But they can have the same beneficial role in your garden as well. A standing snag may be one of the best features to attract a variety of wildlife species to your yard. Although birds are just one of the many animals that will benefit from a snag, to give you an idea of a snag’s importance, up to 45% of bird species in the forests of North America use cavities found in snags.

The rationale behind using nest boxes is that you are providing a replacement for habitat lost from the removal of dead or decadent trees. Dead or dying trees are the first thing to get removed in managed landscapes (whether a backyard or city park), or even preparing up your yard for a wildlife garden. However, by leaving dead trees standing, or even planting a dead tree, you can add habitat, structure and yearlong visual interest to your yard. This is a great gardening project for people concerned about their lack of a green thumb.

What species of tree makes a good snag?
Anything. But in this area cottonwood (Populus trichocarpa), aspen (Populus tremuloides), ponderosa pine (Pinus ponderosa), Douglas fir (Pseudotsuga menziesii ) or lodgepole pine (Pinus contorta) will probably be the best- they are the ones birds, insects and other animals are used to. Although cottonwood and aspen make great snags, they will probably be shorter lived than the pines or fir.

Where can you get a snag?
You may have one and you don’t even know it. Sometimes, the best snag is simply a tree in your yard that has gotten too tall, is diseased or is just unwanted. Rather than replacing it, removing it, or healing it, let it die in place. You could prune it back to shape to an aesthetically pleasing standing snag, and kill it in a variety of ways (from girdling, to a herbicide treatment to heavy handed pruning- obviously without cutting it down), and leave it. For example, in our backyard, one of the first trees we planted was a 4’ Ponderosa pine. It has grown a lot faster than I expected, and right now it is a great size, but my long-range goal for this tree is as a snag in the yard (its days are numbered).

You can also find snags that are suitable for firewood cutting (check local laws about cutting or removing standing or fallen trees from forests, and certainly don’t remove any from riparian area or waterways), in slash piles, or even in your neighborhood where trees are being removed. Contact local tree services- they might even deliver one to you.
How big should a snag be?
As big as you can manage. However, check with building codes for height restrictions in your area (probably not a big deal). Also consider the size of your garden, and adjacent buildings. In general, try to get a snag that will have at least 10’ exposed above grade (so a total length of at least 15’). The larger the diameter of the snag the more useful it will be to wildlife. For example, to get nuthatches or flickers to excavate a nest, the diameter needs to be at least 8-12” where the snag is 6-10’ from the ground.

How to plant a standing snag
Typically strive to bury at least 25-30% of the length of the tree in the ground and set it as you would a fence post. Dig the hole at least below the frost line in your area, and as deep as 30% of the snag length, fill the bottom of the hole with about 4” or gravel or cobble for drainage, insert the snag, check for plumb and back fill and compact the soil around the base. Be careful not to plant the snag under overhead wires or power lines (snag humor- they don’t grow).


Integrate the snag into your landscaping
This is important, make it look intentional and have it blend in with your landscape. A standing snag is a strong structural element in your landscape that can dominate, but with some thought and planning it can blend into the landscape. A snag is a great structure that provides gardeners with an opportunity to showcase climbing or vining plants. In western Montana, if your snag is in the shade, orange honeysuckle (Lonicera ciliosa) or blue clematis (Clematis columbiana) are great vines. If it is in a sunny spot, western white clematis (Clematis ligusticifolia) will be a great addition. Also consider the location for the snag, and place it in a natural surrounding, nestled among trees or shrubs (as opposed to out in the middle of a lawn), and often times it is nice to place on near deciduoius trees so when they lose their leaves in the winter, the snag will provide interest and structure.

They don’t last forever
Eventually the base of the snag will rot (how quickly will depend on the soil type, tree species, age of tree, etc...), so plan for this and perhaps plan to incorporate the fallen snag into your landscaping plans. While you are at it, don’t limit yourself to standing snags, fallen snags also provide a lot of habitat for wildlife and add visual interest and character to your garden. They can also make the base for a brush pile.

Tuesday, May 5, 2009

Construction update: bird nests and greenhouse


Bird nesting updates:

The Black capped chickadees hatched yesterday (May 5), and this puts them just about on schedule for a typical fledging time of around June 3.

The northern flickers are still courting (and stuff I can't mention here), and the male is still doing a little bit of excavating. I think the female may have laid the first egg yesterday (May 5) and is beginning to incubate

Greenhouse construction update:
This weekend, I installed the floor (recycled 100-year old Missoula brick, see below), and framed the four walls. All the framing lumber is from Home Resource in Missoula and most is recycled lumber, the rest is sustainably and locally harvested.


All the framing members that will be exposed- either inside or outside the greenhouse were primed and painted (2 coats), on all 6 sides prior to installation (primer and paint also from Home Resource- $5/ gallon!).

In the photo below you can see the grate over the compost furnace in the floor. This is actually a temporary one, one to use while I finish construction so I don't fall in... again. The grate is slatted to allow warm air and CO2 from the compost to rise into the greenhouse.

To the south (to the right in the picture below) of the brick floor is an open area that will be a raised bed. Hopefully this weekend I will frame the gable ends and even the rafters.

Sunday, May 3, 2009

"Pollinator" gardens

So, until a few days ago, I had never heard the term "Pollinator garden". Apparently it’s a popular term among gardeners now. A few days ago a local naturalist contacted me about a pollinator garden she is designing and wanted some tips. She is a fantastic ecologist, and educator, and I was really flattered she contacted me, so I was eager to help. I played it cool like I knew exactly what she was talking about; I did not want to expose my gardening naïveté. After we spoke, however, I went home and did some research on what a "pollinator garden" was. Surprisingly (to me), there was a lot of information out there, and I even found a recent article in the New York Times (here), and commentary on that article by Town Mouse/Country Mouse.

A pollinator garden is one that is designed to provide flowers for pollinators. Right away I felt myself becoming frustrated with the term “pollinator garden” for its focus on (1) flowers and (2) one category of wildlife.

Mind you, there is nothing wrong with a pollinator garden, per say, and there are certainly many benefits. I am really encouraged that native plants are getting recognized for their vital role in supporting pollinators, but I am not sure this is the appropriate context. The term that should be used is “ecosystem”. More on that later.

If “pollinator gardening” as a concept sparks interest in someone to garden, to garden with native plants or garden for the first time, then it is incredibly valuable. Similarly, if a pollinator garden encourages more people to remove parts of their lawn, then again it is fantastic, and very beneficial to wildlife. So there are many positives with the burgeoning pollinator garden popularity. I wonder if the pollinator garden movement can be traced back to a fantastic book called “The Forgotten Pollinators” by Buchmann, Nabhan, and Mirocha. If you haven’t read it, give it a read.

Although pollinator gardeners might provide nectar to pollinators and help attract some insects, the real problem is we have made vast expanses of land unrecognizable to native pollinators (and many other species of wildlife) by converting our native plant communities to ones that resemble plant communities in other parts of the world. But recent evidence suggests that by using native plants in urban, and suburban landscaping, we can reverse the declines of native insects, and ultimately higher trophic organisms. Douglas Tallamy has written books and papers on this subject (click here for more information and downloads).

However, my first reaction is that “pollinator gardens” are another example of a failed attempt at “single species management”. That is agency-speak for when you manage for one species (often the wrong one), with the intention of protecting the ecosystem. When in fact it is often backward. As I have mentioned before, we need to distance ourselves from the idea of planting a single species to attract a single species or life stage of the species, and garden with a broader understanding of biology and ecology.

"Pollinators" as a group are diverse; they range from ants, to birds to bats. If your goal is to provide habitat or food for pollinators, for example, your garden should be equally diverse to be effective. Furthermore when people think of “pollinator gardening,” most people plant flowers that may attract adult bees or butterflies. However what is truly limiting to many pollinators (especially butterflies and moths), are the plants that host their larval stage. The larval stage is so important- but we don’t garden for it explicitly because we don’t witness the larval stage of pollinators very much. I don't see too many people planting expanses of prairie June grass to promote the larval skippers, though that might be the most important plant in a pollinator garden.

So that brings me back to my ongoing philosophy of wildlife gardening with native plants: think broadly, think holistically, and think of diversity- diversity of structure, diversity of species, and diversity of life stages. Ecosystems are complex and it’s not effective to match one species of plant to one species of animal.

In the end, pollinator gardens are not that bad, and probably a very good thing, but it is a shame the idea is so close to articulating the importance of native plant communities and promoting conservation and restoration of ecosystems, if even at the scale of a suburban yard.