Wednesday, August 26, 2009

8th Street Pocket Park

The 8th Street Pocket Park is a small neighborhood park that uses native plants and landscaping to provide education and outreach to neighbors and students that my wife and I have been working on for the last couple of years. Because of its small size and out of the way location, this little piece of ground was neglected, growing only knapweed (Centaurea stoebe) and dog waste (no Latin binomial necessary). Located between an irrigation ditch and the intersection of 8th and Grant streets, the entire "park" was located in the city's right of way. A few neighbors saw an opportunity to work together and develop a wildflower garden, providing beauty and benefits to the nearby school and surrounding neighborhood.

Our goal was to build and maintain this pocket park as a little piece of wild Montana on the corner of 8th and Grant, by using plants native to the Missoula valley and to provide education & outreach to neighbors and students and a little wildlife habitat in our neighborhood. Our hope was that this park will be enjoyed by passersby, and provide a chance to stop and learn about native plants, and wildlife. To that end we developed and installed interpretive signs (see below), paths to interact and view the landscaping and installed benches to help turn this once weed patch into a destination.

In 2008, we completed the south portion (pictured in this post)of the pocket park (with significant help from a $2,000ish neighborhood grant) and we obtained a grant to complete the park this year by expanding the project by landscaping the east portion of the park. We also hope to continue the strong partnerships and neighborhood cooperation that made the first phase so successful.

The aspect of this project I was most concerned about was that as a public park, I wanted the plants to thrive, for weeding to be minimal, and for it to be a good example of native plant landscaping. My hope was that this would give people ideas for this type of landscaping in their own yards, so as a demonstration garden, this needed to look good. To that end, site preparation was essential, and we spent a lot of time on this.

The first step involved getting rid of noxious weeds through hand-pulling and herbicide treatments. The next step involved using a sod cutter to remove the "grass" (read: dog poop, quack grass, lawn, and dandelions). We installed lawn edging around the perimeter (see photo below), then removed all the sod, waited a few weeks, dug out or pulled everything that germinated, repeated this step again, brought in screened top soil, and compost mix to form hills, planted the area and covered it all with 6" of shredded cedar bark mulch.

From the time it was planted until the end of the growing season, we watered the little park every other day heavily. Since October 2008, we have not irrigated it, and have had only one weeding night. The plants have thrived and I think this has been a great public garden example.

Below part of the park is shown, August 2008, after the area was planted.
Below is a picture of the same area in August 2009, after just one year of growth.

Below is just one of several interpretive signs...Again, the same location one year later.This is one of the only "before" pictures we have. Again, you can never take too many pictures before you begin a project- I never take enough (see my lament here). Below, volunteers are installing lawn edging and laying out the split rail cedar fence, in spring 2008. This picture was taken after we removed noxious weeds, so it actually looks like a lawn here- seeing the area as a lawn, in itself, was a lot of work and represented a lot of progress.This picture is taken roughly the same location in early spring 2009, and if you look closely you can see a black-capped chickadee on the nest box. This spring a pair excavated this box and raised a clutch- success!Below is roughly the same location in August 2009- plants thrived, despite no irrigation in 2009.
Since education and outreach were our primary goals of this project, we installed several interpretive signs in this little park. These signs provide information about the history of the park, the partnerships, as well as natural history of the area and specifically about native plants and wildlife found in the park. Below are examples of two of the six interpretive signs.
Also pictured above is a National Wildlife Federation wildlife habitat sign. This park is certified as Backyard Wildlife Habitat because it incorporates the following elements: food, water, cover, places to raise young, sustainable gardening practices, native plants.

Our neighborhood is deficient in parks and open spaces. Landscaping this site transformed existing public space from an unusable state into an attractive pocket park. While the final product of this effort meets a community need (more park space), the process of creating the native plant landscape also meets community needs.

My wife has been working with the local elementary school through the Flagship Program, an after school program for neighborhood children, and has lead field trips for dozens of children to this little garden. She has gone to classrooms to teach kids about native plants, has had them grow plants that we later transplanted to the park, and has had children help pant and weed this park for the last couple of years .

This project was also shared goal of the Montana Native Plant Society and the University of Montana's natural areas integrated plant management program (my wife's program) to provide education and outreach about native plants and their conservation. Despite the small size of this park, it has addressed multiple community needs, and it is a long way from its former state of knapweed, dog waste, and neglect.

Wednesday, August 12, 2009

Build a suet feeder in five minutes

If you have about five minutes to spare, here are instructions for building a suet feeder for birds this fall/winter. As part of the native plant and wildlife gardening workshop I taught at BOW a couple of weekends ago, I built these simple suet feeders with the class and people really liked them. It is a very simple feeder I have been using for 10 years or so, and it is the main feeder we use in the winter. Although I do have mixed feeling for bird feeders (click here for more information and more thoughts on bird feeders), I'm pretty comfortable using this one. The lack of perches and the placement of suet holes deter non-native birds like house sparrows, European starlings, and house finches. Those species like to perch on something while they eat, but native birds feed on suet and in the cavities and crevices of trees are "clingers" and are used to walking up and down trees.

These feeders are very easy to build (a great project for kids), and they are surprisingly effective for a variety of native birds including chickadees, nuthatches, brown creepers, many species of woodpeckers, and even juncos. I think the reason these feeders are so effective is that they mimic the trees (since they are, in fact, made of trees) that many native birds use for natural foods like insects and spider eggs. So, it is no surprise that birds have the search image of a log with treats inside.

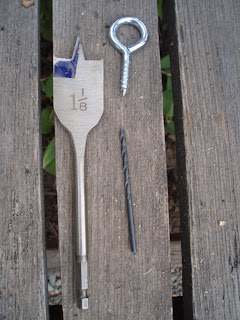
Pictured below is everything you need to make one of these suet feeders- a log , a screw eye (I use #6), a drill bit to pre-drill the hole for the screw eye, and spade bit to drill holes for suet (1"- 1 1/4" ), and a drill.

Start with selecting a log. Any size will work (at least 8" long), the taller the better and at least 4" in diameter. It is nice to have a variety of sizes in your garden, some small ones that will only accommodate little birds like nuthatches, and some larger that will satisfy big woodpeckers.

Drill a pilot hole in one end for the screw eye.

Install the screw eye. Now you are almost done!

Then, bore out holes for the suet. Place as many as you'd like, and drill them about 1" deep. Try to keep the upper holes at least 4" from the top, so non-native birds won't be able to perch on the top and reach down into the holes.


Load the cavities with suet- it is easiest, but messiest to do this when the suet is room temperature.

Install and watch for birds- let me know how they work.

Friday, August 7, 2009

Time series and change in our back yard: garden design workship

It is always amazing how quickly things change in the garden. I routinely make the same mistake and don't take enough "before" pictures. It is always fun and educational to look back on how the garden has changed, and I thank Nan Ondra at Gardening Gone Wild for this opportunity to reflect on changes in our garden. This month's Garden Blogger Design Workshop is titled "Time in a Garden" and the idea is to examine the effect of time on your garden. If you haven't visited Gardening Gone Wild, this is a great opportunity. It is a fantastic website/ blog covering a lot of information and has really interesting posts.

The photo at the beginning of this post and the one immediately below are taken of roughly the same location, nine years apart. Both are looking to the northeast corner of our back yard, and to me really show the dramatic change in our yard. It also is a reminder of how I need to take more "before" pictures. Even this "before" picture was after we removed a dog house, cut down waist high weeds and began removing lawn and installing native plant garden beds.
Below I have a series of pictures from 2000- 2009 from two angles.

June 2001 - The first angle is looking north from our backdoor. By the pose and the proud look on our faces, I think we thought we were done landscaping, and we were eager to just sit back and enjoy the fruits of our labor. It is too bad we did not take any pictures before this- we had lived in the house for two years by 2001, and had done a bunch of work in the back yard. We installed the vegetable garden, reduced lawn, added native plant garden beds, and more. Nevertheless, there are plenty of changes in the photos that follow.

May 2004- I guess we did not sit for too long. Here you can see we added raised beds to the vegetable garden, and expanded all our native plant garden beds.
June 2004- We expanded some beds more and realigned the path. Click here for a post on how to build an urbanite path of your own.

June 2005- The changes here included replacing a lilac with a hammock stand in the back part of the yard, and expanding some beds even more. July 2008- We kept expanding the garden beds and made the lawn even smaller.
July 2009- Building the greenhouse was the biggest change, but we continued to expand the garden beds and shrink what little lawn we had left.
April 2000- This view is also of our backyard, looking to the northwest, and primarily shows our vegetable garden.
May 2004- We added raised beds and a grape arbor, started more native plant beds, and removed more lawn. July 2005- We expanded the native plant beds, and painted our house, garage and bat house.
July 2009- More native plants and a more mature landscape.
A lot has changed in our landscape over the last nine years, and it was all done incrementally, and even some areas, installed, and reinstalled over that time. I hope this inspires some of you to tackle your own projects- just remember to take some pictures before you begin!

Monday, August 3, 2009

A new chapter in the quaking aspen and longhorn beetle story

The longhorn beetles aka aspen or poplar borers (Saperda calcarata) have hatched and lots of animals are after the larvae before they burrow deep into the quaking aspen (Populus tremuloides). This is just another chapter in the fascination ecology of quaking aspen and longhorn beetles. In order to determine how long it takes for the eggs to hatch, I labeled the places where female aspen borers laid their eggs (click here for more information), and I have been periodically checking back in on the egg masses (yes, this is the kind of thing I wonder about).

It turns out, it takes about 2.5 weeks for the larvae to hatch (which is consistent with the literature). I first noticed they hatched when I saw ants congregating around the egg mass locations, pulling the newly hatched larvae out (see photo below).All this activity on the aspen did not go unnoticed. Soon, bald-faced hornets moved in, displacing the ants, feeding on the larvae. And, if you recall, this is where the whole story began, with bald faced hornets chewing bark to mix saliva to make their nests.


It did not take long before any of the surviving larvae burrowed deeper into the cambium, protected from ants or bald-faced hornets. However, still shallow in the trunk or branches of the aspen, they are easy prey for woodpeckers. Last night a hairy woodpecker showed up. You can see in the photo at the beginning of the post and below this male hairy quickly drilled a hole into the aspen and spent the evening eating the borer larvae.

Sunday, August 2, 2009

BOW Native Plant Gardening workshop information

Thank you all that were in my class today at Montana Becoming an Outdoor Woman (BOW) summer program. I hope the native plant gardening class was useful and inspired all sorts of gardening and wildlife landscaping ideas. As promised, here are some of the books and references I talked about in the class:

The Magic of Montana Native Plants: A Gardeners Guide to Growing over 150 Species from Seed- Sheila Morrison

Bringing Nature Home- Douglas Tallamy

The Not So Big House series- Sarah Susankah
- Examples: Creating the Not So Big House, Inside the Not So Big House, and all the others

Fine Gardening Design Guides
–Example: Gardening in Small Spaces

Best of Fine Gardening Series
–Example: Garden Rooms

Shrink Your Lawn- Evelyn Hadden

Noah's Garden: Restoring the Ecology of Our Own Backyards- Sara Stein

Paradise by Design, Native Plants and the New American Landscape- Kathryn Phillips

The Forgotten Pollinators- Buchmann, Nabhan, and Mirocha

Landscaping Ideas of Jays- Judith Larner Lowry

Gardening with a Wild Heart -Judith Larner Lowry


Also, here are links to some posts on this blog that we discussed int he class


It was wonderful to see such a diverse group attending Montana BOW this year- it is a wonderful program. At breakfast and lunch I was really impressed by what a great time people were having and I really enjoyed everyone's enthusiasm for the workshops they participated in .

Monday, July 27, 2009

Even native plant gardens need maintenance


Even native plant gardens need maintenance. All too often I see native plants advertised as "low-" or "no-maintenance". Although it is true plants native to your area will require less maintenance than conventional, generic plants (that is, those not suited for a particular climate or locale), they do require some maintenance in a garden setting. As I often remind people, it is "xeri-scape" not "zero-scape".


Inherently, periodic care, cultivation or just maintenance defines a "garden" and distinguishes it from a natural area. Perhaps instead of "maintenance free", native plant gardens should be thought of, and referred to, as "less resource intensive". This is probably a more accurate, and appropriate descriptor, since, in their native environment, native plants do not need soil amendments, fertilizers, pesticides, protetction from hot summers or cold winters, and additional water (once established), but they do require care.

I think that the lack of attention people pay to native plant gardens does a disservice to promoting native plants as landscape alternatives, especially when the aesthetic is a departure from the accepted norm. The norm being the French or English garden of a manicured lawn, and a few specimen trees. As I have mentioned in past posts (read: ranted), native plant gardens need to be thoughtful and consider the same design elements as any landscape. Having a native plant garden is not an excuse to to have an unkempt garden.

Maintenance for a native plant garden may be for a variety of reasons including: aesthetics, "tidiness", to promote undergrowth, to deadhead and prolong the bloom (though this is not very effective in our climate since we do not water), to maintain diversity of plant species and structure, or so some flowers don't set seed.

As far as letting flowers go to seed or restricting them from seeding, I do a combination. I like to leave a lot of seed heads on plants for birds, and insects but not necessarily all of them. For example, showy fleabane (Erigeron speciosus), three-vaned fleabane (Erigeron subtrinervis), and hairy golden aster (Heterotheca villosa), and others are prolific seeders, and without management they would probably end up dominating the garden. So, in certain areas of the garden I cut them back to limit their spread. However, they are easy to grow, beautiful flowers, so I many places I am not too disappointed if they take over. Others, like blue flax (Linum lewisii) and bluebunch wheatgrass (Pseudoroegneria spicata), I manage more intensively (see "What is a weed" and "Shades of blue" posts for more information).

Seeds of blanketflower (Gaillardia aristata), and many aster and erigeron species (I can't necessarily tell many of them apart), get eaten by pine siskens late in the winter. Some seeds, like balsamroot (Balsamorhiza sagittata) and narrow-leaf collomia (Collomia linnearis), get eaten almost immediately by beetles and shield bugs.
This evening I did a lot of, what I call "non-technical" pruning. I cleared out several paths (see photos above and below) that had be overgrown by flowers, and reshaped many plants to provide depth, and diversity to the landscape. To me, this is the fun part of gardening- reshaping and redefining spaces. Plus it is fun to just experiment and "putter" about the garden.

Below is an example of hairy golden aster stems, flowers and seeds I use as a mulch. I placed the seed heads and flowers of hairy golden aster cuttings over soil in a area I just planted as a base layer of mulch. This will help hold in soil moisture, retard weed establishment and seed the area with hairy golden aster. I will add a thin top coat of shredded bark mulch to complete the planting. I have tried this a few times with hairy golden aster and it works well.
After pruning, you are left with a lot of trimmings (see photo at the top of the post) and what to do with all the plant material can be an issue and daunting. Any leafy plants, I just compost, but plants with tough or nearly woody stems I just add to the brush piles in the yard we keep for wildlife. Apart from the benefits to many wildlife species, brush piles are wonderful features in the garden to contain the surprising amount of biomass even a small xeri-scaped yard can produce.

Friday, July 24, 2009

Greenwashing


I live in a green home. My home is not special, nor was it marketed as an example of “green” building. Like hundreds of houses in Missoula, it was built in the 1940's using durable materials (intended last 100+ years). Its construction contributed to the local economy and was made from locally available, sustainable materials. The wood was harvested by local workers from local forests and milled locally. It is small by today’s standards, but it is a great, useful space and occupies a small footprint, and we do not need bigger house.

I do not have an on demand water heater, fiber cement siding, photovoltaic panels, solar hot water (though I’d like to), low VOC paint, bamboo flooring (I could rant about this greenwash sometime), sustainably harvested exotic wood decking or all the other trendy “green” building products. However, when I moved into it, my entire home was 100% reused.

To me this is the best way to promote “green” building: buy a home that is already in place. It is surprisingly simple, yet in much of the green literature this view is not expressed. I think the first step in green building should be “build nothing”. But that probably won’t sell too well.
Inherently, buying, remodeling or renovating an existing home, is less impactful, less resouce intensive, and more sustainable than new construction.

I was very disappointed to read a story about green building in a magazine at the airport recently that was devoted to the topic. One article was devoted to questions and answers about how to build green. This question caught my eye, it went something like this, and I will paraphrase:

Question: Can my existing home be green or can I green it?

Answer: Maybe, but you will probably be better off building a new one and incorporating all the green features you desire.

After catching my breath and counting to three, I have to allow that, in fairness, there is some molecule of truth to this. Some things are more cost effective or practicable with new vs. existing construction. And there are a lot of limitations (read: opportunities or potential from my perspective) with my old house. For example, the walls are only 2x4 construction, location on the lot does not provide a great location for PV panels or solar hot water, when poured, my foundation was not insulated, and these things are difficult to change.

However, because of decisions we have made and our lifestyle, our home is energy efficient and “green”. Compared to other homes, we use very little water, gas and electricity and every year we strive to and do use less and less. We make improvements to the efficiency to reduce your demand, and it has been working.


As we have remodeled we have tried to be thoughtful about our choices for building materials and energy efficiency. We recently installed a metal roof after eking out all possible life from the existing roof, replaced the worst leaking windows and those on the south face of our home with efficient low e glass. We even painted our house rather than installing new siding, since our ugly siding was in perfect shape and will probably last forever (unfortunately). Throughout our remodeling projects we use reused and recycled materials whenever possible, and from local sources. We have been slowly upgrading to all energy efficient appliances, as our budget allows and as the appliances that came with the place succumb to old age. Our biggest remodel is our basement; will be mostly made from reused materials.

Obviously green building is a business, and it is a concept that is selling now. For many, building green has nothing to do with sustainable living, but is a way to justify living unsustainably. The bottom line is building and living green does not have to be expensive. We can make simple choices and thoughtful decisions, most of which require no money but often require difficult changes. I am sure many of you live in green homes, too. The biggest things you can do to green your home or life are often free.

And don’t forget your native plant garden for local wildlife.

Thursday, July 23, 2009

Greenhouse in the heat: greenhouse operation update

It was 100 degrees today in Missoula, summer is here, and the greenhouse is fairing well. I installed a shade cloth a couple of days ago (see photo above), to help moderate temperatures, but mainly to reduce the intense, glaring sun, rather than for cooling. Actually, despite the high temperatures, the greenhouse is staying relatively cool. By relative I mean less than 120 degrees, and this maximum has not changed in a few months.

I was curious how the greenhouse would do in the summer, and in May we were already getting temperature in the 110's (yes, I do monitor the temperature daily, hourly in fact, with a wireless thermometer that uploads data to my computer). These temperatures are at about 7', most plants are actually cooler, growing from the floor of the greenhouse.

I designed the greenhouse for the winter, and for the low winter sun. The roof angle is pretty steep to intercept the low sun, and the west wall is not fully glazed. The north wall, and north facing roof is conventionally framed and insulated (click here for more information).

Because of the steep roof angle, and glazing only on one face, thermal gain in the greenhouse in the summer (when the sun is higher in the sky), is not as much as you'd expect and a lot less than with a lower pitched roof, or with a conventionally designed greenhouse or commercially available or kit greenhouse.

Since windows on the west and east sides are set pretty low, in the afternoon in the summer the west side provides shade. In the winter, because of the low sun angle and the sun's position further south, the sun won't even hit much of the west wall and only for a brief amount of time.

Cooling greenhouses in the summer is normally a bigger issue than getting it hot enough. As a result, I planned on venting the greenhouse with a solar louver vents on the gale ends, a solar window opener on the east end, and a thermostatically controlled exhaust fan. After the results for far, I am not sure the exhaust fan will be necessary, though I will have to look a little more at my temperature data as the summer goes on.
So far so good. I have been really happy with my design, but we'll see what happens in the winter and how well the compost furnace works. Although I am really into the design, operation and construction of the greenhouse, my wife is more interested in using it and enjoying it.

Four flicker fledglings feasting...

...on service berries, chokecherries, dogwood berries, and, of course, ants. All the fledgelings have been traveling as a group and feeding together. It is a riot to watch them. They spend a lot of time eating service berries in our yard with a robin (I think it is the same robin, but I have no idea really).

In other fledgling news, as I tweeted the other day, the chickadees fledged while I was at work. This seems to be how the year is going, between the flickers fledging, the first clutch of chickadees fledging, the bitterroots flowering and now the second clutch of chickadees all fledging when I am at work.

To outsmart the little chickadees, I recently got a mini wildlife camera and I hoped to get it running before they fledged, but I didn't. The main reason for the nest cams is to mount them inside nest boxes and I'll do that this winter- one in the flicker box and one in one of the chickadee/ nuthatch boxes. I will have a link on the blog for streaming video. More on this in the winter...
As I predicted, the second clutch fledged much quicker than the first. The second clutch only took 17 days from hatching to fledging. Normally the first clutch fledges about 20-22 days after hatching.

Saturday, July 11, 2009

Quaking aspen, longhorn beetles, and the wildlife that love them

Based on searches directing people to this blog, adult aspen borers (Saperda calcarata) are very active in people's yards and on their quaking aspen (Populus tremuloides) trees right now. The insects themselves are fascinating, beautiful and downright crazy-looking. And although I love the intrinsic value of having the borers using the trees in our yard to complete their life-cycle, the complexity of their relationship to other species is enormous. As I have mentioned, aspen are probably the most important plant species in our yard for attracting and providing the needs for diverse species of insects and birds.

The photo above is of an adult Lorquin's Admiral (Limenitis lorquini) in the picture it is feeding on the sap from the damage the larval borers cause. Likely it is also drawn to the aspen to lay eggs; Populus species are the host plant for Lorquin's Admiral caterpillars.
Adult borer activity probably peaked in our yard a week or so ago, but a few adults (see below)can still be found mating and gravid females laying eggs (like the one above). I have received some wonderful comments from people (some on some blog posts and some via email), that are finding a new appreciation for these animals.