 The joys of March in Montana. It has been a few years since we have had a typical March- today it was 20, last week I connected my rain barrels, and the melting snow from yesterday's storms has left my barrels filled to capacity (and over-flowing). I guess my earlier proclamation about spring was a little early. This weather has not been really conducive for the gardening projects I an anxious to begin.
Here is a fun project to do when it is otherwise inhospitable to work on your other garden projects, build a rain barrel. I have gotten a bunch of questions about how to build them and although there are plenty of online resources from everything to how to build your own to buying ready to use ones, I thought I’d write a brief post about building one.
Like I mentioned, if space and money were not an issue, I’d get the biggest cistern I could fit underground in my yard, and a pump to deliver water for irrigation and other uses. But, since both limit me, several rain barrels is a cost- and space-effective, solution. Especially in a freezing climate, where disassembly in the winter is essential.
Start by getting barrels. You can go here to figure out how many you will need, and how much precipitation your area receives.
Barrels can be acquired a number of different ways, but I’d recommend buying a used, recycled plastic barrel. Most of these are food grade, and were used to ship things like olives, garlic and other smelly things (I like those smells). They are really sturdy, and have thick walls, which is important for storing hundreds of pounds of water. Unless you were going to use the barrels for heat, use a plastic one (metal is a better thermal conductor, so if you are going to use it as a solar heat sink, too, opt for metal, and again, buy them used).
You can find these barrels at recycling or re-use centers (like Home Resource, in Missoula), and other places (Craigslist, etc…). In Missoula, I got mine at the Axmen for about $25. There are a variety of sizes, the most typical is 55 gallon.
The rest of the components can be purchased at a hardware store or a re-use center. There are a lot of ways your can build a rain barrel, but the things to consider are getting water in, getting it out, keeping debris out, and letting air in (to let water out), and finally, these things weigh a lot when full (over 350 lbs, each) so make sure it is on a level, stable, elevated (to get water out) surface.
If you choose to build one for yourself, you will save a lot of money, have the option to use recycled products, and customize it to fit your needs. Plus you have the added satisfaction of building something you will use daily.
Materials
- Barbed 90 degree, threaded fitting, washer and nut, hose for overflow
- Ball valve spigot (aka, hose bib, sill cock), washers, nut (make sure to get a ball valve not a gate valve)
- 4” or 6” atrium grate, and screen(for intake)
- Downspout components, elbows (depending on style and situation)
- 100% silicone caulk
- Sturdy, elevated base
- Strapping (hot water heater earthquake strapping)
If you will have two or more barrels connected in-line, you will also need
- Vent (round, soffit vent), screen, and short length of hose
Start by figuring out a location for the barrel- here you will be limited by your downspout location. Next build a level base that is capable to supporting the weight of the barrel(s). I use cinder blocks- they are sturdy and often free or very cheap at recycling or reuse centers. You want to build the base as high as possible and convenient for safety and to have enough hydraulic head to deliver water down to your plants. Minimally, you want to be able to fit a watering can under the sill cock. When you have your base, set the barrel on top of it and determine how to connect the downspout to the barrel- they are many options here- see photos and descriptions below.
Building the barrel
Start by marking the locations for the holes you will make for the various components. Start at the top - line up barrel in a good location, screw on lid and mark location of were intake will be, where the spigot will be, and overflow will be. These location are important, because it will make it more convenient to use, and the more convenient it is, the more you will use it. Below are a couple of examples of the different intake systems I use on my two different style downspouts. The one on top is easier to work with, and uses a 6" atrium grate, with 5" diameter round downspout. The bottom photo shows a 4" atrium grate with a more standard 2"x4" downspout.

 A word on height- you want to locate the spigot close to the bottom, so you can take advantage of as much water as possible, but not too close to the bottom because of sediment accumulation, or room to get a watering can access. Also, you want to think about gravity feeding, that is place the barrel as high as you can so there is enough hydraulic head to deliver water to lower plants. If you elevate the barrels, or if you are concerned about tipping, or children tipping them over, consider adding strapping to secure the barrels to the house or building. You can use earthquake strapping or kits sold for stabilizing hot water heaters (this is building code for hot water heaters in earthquake prone areas).
Once you have everything marked, using a spade or Forstner bit, drill a hole to snugly fit the sill cock – you should be able to thread it into the side of the barrel. Apply silicone to the washers and nuts to make a water tight seal. Use a ball valve, rather than a gate valve- ball valves cost more but are much less prone to wear, and they release water quicker and more efficiently.
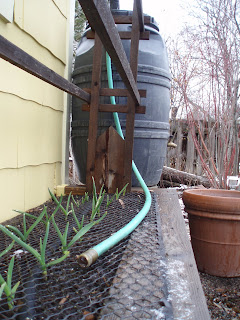
 Next, drill a hole for the overflow (see photo below). Insert a fitting that will connect to a hose and use silicone and washers to ensure a tight seal. Connect a hose to the overflow that is long enough to extend far from your foundation and will reach plants that might enjoy a little water. In the photo below you can see the overflow directed to our garlic bed. You can also see the netting we apply to our beds to keep the wonderful neighbors' cats out, more on this here and I am sure, later.
 Cut a hole in the top for the atrium grate (use a hole saw or a jigsaw), and cut a piece of screen to fit around it (see photos below, the second one show the screen over the atrium grate- with the barrel top up side down). The atrium grate is easy to clean leaves and other large debris but it will not keep mosquitoes out- this is where the screen comes in. Screw the atrium grate in place.
 If you will be connecting two or more rain barrels in series, you will need to add a vent, and an inlet hose. The inlet hose (shown below) is in the same location as the overflow hose. In the receiving barrel, you do not need a fitting for the hose, simply drill a hole just large enough to accept the hose and insert it.
 Finally, cut a hole in the top for vent (use a hole saw or a jigsaw). This vent will allow air to enter the barrel if you drain it and will break the vacuum, allowing water to exit easily. Again, cover the hole with screen (see photo).

 You are done. Now start collecting water.
"You are done"? I'm exhausted and I haven't even been out to buy the supplies!
ReplyDeleteWhile I gather my strength I do want to say that this is great information, and I hope many Web searchers will find this fine post.
Thanks, Daffodil!
ReplyDeleteI am glad you enjoyed the post. I was hesitant about writing one about building a rain barrel because there are so many good websites with rain barrel information.
Let me know how yours go.
Thanks again,
David
Nice detail and pictures. Thanks. I need to talk hubby into doing this ASAP.
ReplyDelete