Monday, May 23, 2011

My new garden project- an insect collection


One new project I didn’t add to my list of garden projects for 2011 is documenting all the insects in our garden in the form on an insect collection.  I am really excited about this project. I haven’t made an insect collection since my college entomology class, so I am eager to relearn some identification and preservation skills.  One of my inspirations for this project came from Jen Marangelo (who was in that college entomology class with me) who is starting the Missoula Butterfly House and Insectarium. 

Jen, who has quickly emerged as the insect-human liaison in Missoula, was eager to help me get my little project underway and quickly gave me a list of tools, equipment and supplies I needed to get stared.  Today a box of everything I ordered arrived (I should note that it took over a month to get all these supplies from a company I won’t be promoting anytime soon.). Nevertheless, all my stuff is here, and I am excited to start searching for, documenting and "preserving the biodiversity" of our garden!

If you don't know about the Missoula Butterfly House, it is a great cause, and in a moment with Jen and seeing her enthusiasm for the project, you know it is going to succeed.  The mission of the Missoula Butterfly House is to promote an appreciation and understanding of insects and their relatives through public education and the development of an invertebrate education facility- a year round tropical butterfly house and an insect zoo with live insects, spiders, etc and hands-on exhibits.

The Missoula Butterfly House is a wonderful idea, and needs your help to become established, so consider becoming a member- membership is only $35 (and tax deductible).

I'm going to go outside and look for some more bugs. 

Wednesday, May 18, 2011

Backyard Birding, Bird Nesting and Garden Update

Do you ever take your laptop out to the back porch and use it to call in a ruby crowned kinglet, just to piss him off?  I do.

Anyway, I thought I’d take a moment to provide an update of what’s going on the in the garden.  It is a really busy time now- lots of stuff happening in the backyard (and elsewhere in life).  Spring is really here and birds are coming and going, plants are growing and flowering, and things are changing all around.


Garden update
Every year is different in the garden and that is what often makes it so much fun and interesting.  This year is shaping up to be another good year for arrowleaf balsamroot (Balsamorhiza sagittata)  in the garden (the last time I proclaimed this was in 2009, ironically on almost the same date – May 15).  By the way, 2010 sucked for balsamroot in our yard.  The exciting thing is so many of the volunteer balsamroots are still going strong, and in probably only 4 years our front yard will be awash in them (just as I predicted in 2009). 

2015, baby- lots of balsamroot.  Check back.

The other good news is that this year, volunteers from another one of our long-lived, slow to flower, plants, the silky lupine (Lupinus sericeus), is flowering!  This is the first time that has happened.  It takes about 5 years to flower and my wife started the originals from seeds in 2000.  So, a mere 11 years later we have flowers from the second generation.  This whole feat is probably worthy of a dedicated post (maybe I’ll try to convince her to write a guest spot).


Looking back on the pictures and the post about balsamroot in our garden from 2009, it shows how everything in the garden is on the same pace this year.  We had a slow spring, but now it seems like everything is suddenly caught up.

Speaking of getting caught up, I recently revisited my list of garden projects for 2011, and I am making some progress, and I’ve even added a few more projects.  The garden is never done, which is a good thing when you like to garden.
  • I planted some mountain ash (Sorbus scopulina) in the decadent quaking aspen (Populus tremuloides) stand.
  • I rearranged some plants in the front prairie, including getting rid of a green rabbit brush (Ericameria viscidiflora) and added some wood’s rose (Rosa woodsii), wax currant (Ribes cereum) and shrubby cinquefoil (Dasiphora fruticosa- by the way, when was the genus changed?) close to the house.
  • I made a "cut-off" trail in front of the onion bed. The area near the grill shed is kind of a congested area in the garden and by adding this new trail/ path, people will be able to flow better.
  • While I was at it making new trails and installing urbanite, I moved our concrete path 3’ to the north to make the bed larger and for traffic to flow better.  I am really happy how this turned out, and with all these projects, when things settle down, I’ll devote some time to individual posts.
Flax management

My motto with blue flax (Linum lewisii) is “a little goes a long way”.  Sure, it is aggressive, but it is beautiful, and the blooms last for 6 weeks or more.  It is a great accent plant in the garden to provide almost electric blue flashes of color.  But too much flax looks really weedy.  So, I actively manage it in the garden.  My plan usually involves removing older individuals- they get woody, too big, and they produce a lot of seeds.  In the wild, flax you see are typically about 3 stems or so, and, to me flax this size these look like they are appropriate in the garden.  I usually wait until after a rain, and pull them out by their taproot. Plants I get all the roots out of I save for friends (or enemies- a gardeners joke!), and the other ones I compost (though they are very slow to breakdown) or put on the brush pile.


This bucket of flax is heading to Kathy at Blackfoot Native Plants Nursery, who is a friend, I assure you.  She asked for them. I swear.

Bird Nesting Update
  • Nuthatches
    • They laid their eggs around May 4, so the eggs should hatch around… May 18th- today!  I need to spend sometime this evening loitering around the box.   
  • Chickadee
    • The chickadees have 8 eggs in their box, and hatching should be around May 24 (incubation is around 12 days).   You can always look into their box and see what’s happening on the nest box camera.
  • Flicker
    • The flickers have been around and have excavated the box.  They also excavated two holes in my neighbor’s silver maple.  They tried this last year, and I was so happy for them, but ultimately they got displaced by squirrels and nested in our backyard nest box.   I suspect they will nest here again.
Backyard Birding
The backyard birding has been really good this year. Species are coming and going on their way north, and to nest.  White crowned sparrows and Townsend’s solitaires in particular have spent a lot of time in the garden this year.  Also, Varied thrushes, Chipping sparrows, Bohemian waxwings, Song sparrows, Ruby crowned kinglets (including the angry little guy at the top of this post) and other species arrived at the same time as past years; hummingbirds seem a little farther behind.  There have been reports of hummingbirds from all over town over the last week or more, so they are here, and any day they’ll come to our garden.

Locally, the feeling is that things are behind schedule- owing to the cool spring, but the fact that species arrivals are in sync with past years speaks to the larger spatial scale at which they travel and interact with the landscape as a whole.  It is like the difference between weather and climate. Interestingly, yellow warblers arrived in our garden three weeks ahead of past years.

Looking back on the pictures and the blog post on balsamroot from 2009, I referenced earlier, it shows how everything in the garden is on the same pace as last year.  So the gist is, a lot is going on and it is just about the same as it always is.  Or something like that.

Wednesday, May 4, 2011

Nuthatch and chickadee nesting update

The red-breasted nuthatches completed their nest, and apparently have begun incubating eggs.  Today the female remained in the nest and the male visited regularly to feed her.  He also spent quite a bit of time smearing sap around the entrance to the nest (shown above). This behavior is characteristic of the red-breasted nuthatch, but several nuthatch species perform tasks that help keep their nest free of pests and parasites.  For example, white-breasted nuthatches with scrape the outside of their hole with bad smelling insects to dissuade intruders. 

The female will incubate the eggs for two weeks, so around May 18th the young should hatch.

This year we installed a camera on the outside of the nuthatch box, and we will stream it when things get interesting.  Next year, we'll probably move that camera inside their nest box.  

The chickadees are just about done with their nest construction and similar to the past, it is made mostly of squirrel fur, and some antelope hair.  The female has been roosting in the nest box for the last couple of nights, and I suspect she will begin laying eggs anytime now (if she has not already).  Unlike the nuthatches, we have a live streaming camera inside the nest box- click here to see what is going in inside 24/7.

Monday, May 2, 2011

Green Roof for the Grill Shed; phase 1

I posted a slideshow depicting my little green roof project last week (click here) and this is a follow up with some details about its construction and the plants I used.

Building this "green" or "living" roof was a really fun weekend project and one that I have been thinking about for a long time.  My initial thoughts about green roofs came about from discussions with Kevin DePuy of Adapt Design + Build.  He and I have talked about putting a green roof on the entrance to the Home ReSource building, and we each expressed our desire to try some new things; I wanted to try native plants, and Kevin was looking at it from a building perspective- about making some low-cost green roof solutions for a variety of roof pitches. 

So after some thinking and reading books about green roofs this winter, I figured the best way to learn is to try it, literally, in my own backyard.  What I learn here, I will hopefully incorporate into the green roof at Home ReSource, but really, I want to add a green roof to my garage (that will be Phase 2!).
Ironically, a few years ago, my friend Mike joked that my wife and I had already finished landscaping our yard, so what were we going to do next?  Then he quipped are you going to add another level?  Well, it turns out he was right!
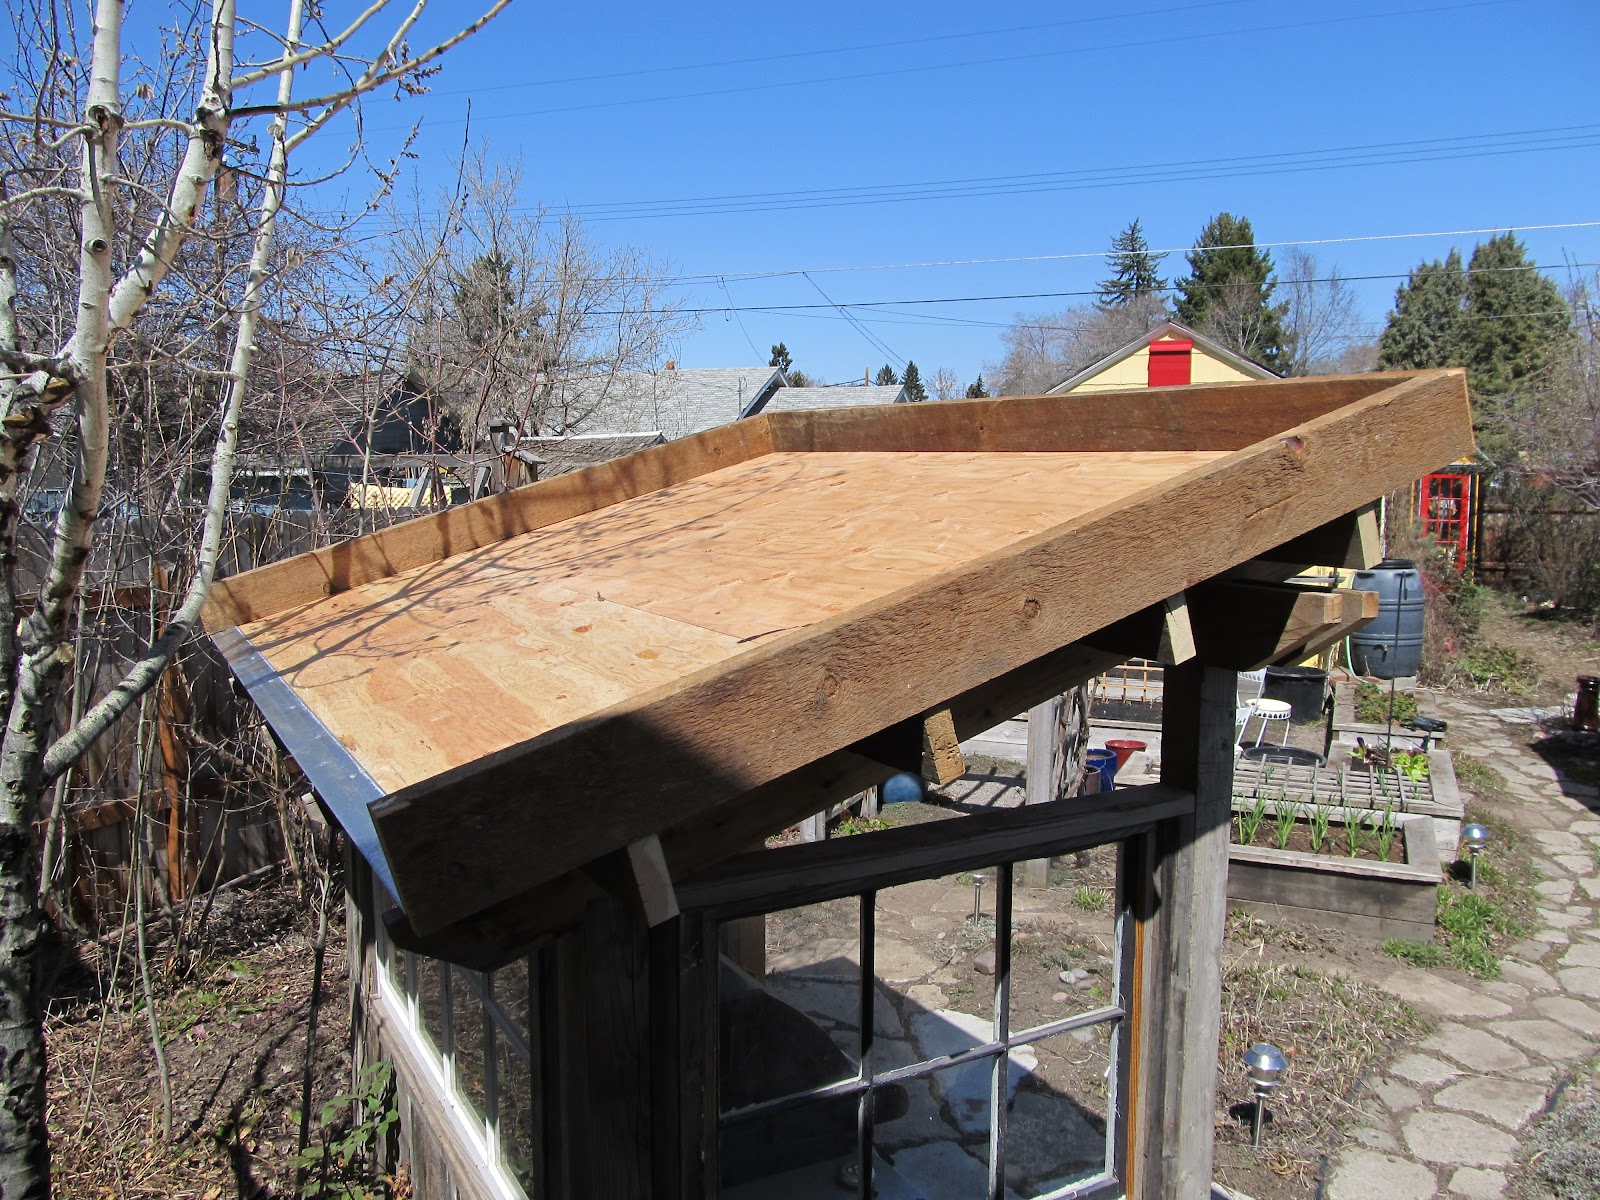
Roof construction
The first step in this project was removing the metal roof (it went back to Home ReSource, where I will probably end up buying it again!), and reinforcing the framing to bear the weight of the new roof.
I added reclaimed 2x5 purlins on top of the rafters, and sheathed the roof in exterior grade plywood.
Then I added a reclaimed metal drip edge,
and framed the rest of the roof with reclaimed, rough cut 2 x 6.

I then installed a self adhesive waterproof membrane- this is the most expensive part of the whole project, but luckily they have a bunch of this type of material at Home ReSource.  After some looking around, I found a lot of options there.  One was a rubber pond liner- this would work great, but I wanted to keep weight down, so I went with the membrane.
On top of the membrane, I laid down landscape fabric, and fully encased the gravel drainage layer. 
I added about 2” of gravel to the roof, and the reason I fully enclosed it was so the roots did not penetrate it, and so the gravel wouoldn’t shift or fall out of the drainage in the roof.
In retrospect, this is a lot of weight.  Although gravel is cheap, I’d look for another alternative for future green roofs.  I know many manufacturers sell plastic drainage layers and that might be the best alternative.  We’ll see.
Soil mix
On top of the landscape fabric I added a rooting media.   There are a lot of differing options and opinions on soil mixes for green roofs, and this is one area I wanted to experiment with. Over the course of mixing it and applying it, I changed the ratio a few times.  My initial plan was to use equal parts of compost, pumice, and perlite.  The whole idea is to have a light weight soil mixture, that has a fair amount of volume for roots, but drains well, and does not contain too many organics.  Although I considered using other materials like sphagnum peat, crushed Styrofoam and others, I eventually ruled them out.  As this progressed, I eventually stopped using compost- I was afraid of too much nutrients for the plants and the compost I also feared might hold too much water (for weight), and I switched to composted bark mulch (soil pep) and perlite.  
This is a really light and loose mix.  I went with 3”, and I think this will work out well.  In the end, it is probably ¼ perlite, 1/3 compost, ¼ composted mulch, and 1/6 pumice.
To hold everything in place while the plants got established, I covered the roof in burlap.  This will breakdown over time, and to plant it, I just cut holes in it.
Plant selection
I really wanted to use native plants for a green roof, and that is how this whole thing got started.  We’ll see how my selection goes, but my goal is to find a mixture that includes a diversity of plant species (read: not all sedum, like many green roofs), for human interest, wildlife (insects and the like) value and aesthesis, low rooting depth (that is, no taproots), fibrous roots that with help to bind the soil, plants that seed prolifically (to fill in the roof), a diversity of heights and textures, drought tolerant, plants that are easy to grow, species that are commercially available, and plants that are relatively low growing.  
Here is what I settled on: 
  • Prairie June grass (Koeleria macrantha), bunchgrass, prolific seeder, deepest root depth of the group
  • Idaho fescue (Festuca idahoensis), bunchgrass, prolific seeder, low rooting depth
  • Yarrow (Achillea millefolium), forms a mat and spreads with rhizomes, tallest plant (when in flower)
  • Rosy pussytoes (Anntenaria rosea) - forms a mat and spreads, their light foliage reflects sun
  • Cutleaf daisy (Erigeron compositus) - these form a low mat and flower for a long time (starting in April)
  • Lanceleaf  stonecrop (Sedum lanceolatum).  I used sedum because it is a requirement on any green roof.  It is mandatory. And they enforce this.  A nice succulent, though.
  •  Elkhorn clarkia (Clarkia pulchella) this is for color- they are annuals, with very shallow roots, but they readily reseed
Plants for this project I got from my own garden, from the UM Conservation Nursery at Fort Missoula and from Kathy at Blackfoot Native Plants Nursery, and the Elkhorn clarkia I grew from seeds from Native Ideals Seed Company.
I'll post updates about the successes (or failures) and we'll see how it goes.