Showing posts sorted by relevance for query green roof. Sort by date Show all posts

Monday, May 2, 2011

Green Roof for the Grill Shed; phase 1

I posted a slideshow depicting my little green roof project last week (click here) and this is a follow up with some details about its construction and the plants I used.

Building this "green" or "living" roof was a really fun weekend project and one that I have been thinking about for a long time.  My initial thoughts about green roofs came about from discussions with Kevin DePuy of Adapt Design + Build.  He and I have talked about putting a green roof on the entrance to the Home ReSource building, and we each expressed our desire to try some new things; I wanted to try native plants, and Kevin was looking at it from a building perspective- about making some low-cost green roof solutions for a variety of roof pitches. 

So after some thinking and reading books about green roofs this winter, I figured the best way to learn is to try it, literally, in my own backyard.  What I learn here, I will hopefully incorporate into the green roof at Home ReSource, but really, I want to add a green roof to my garage (that will be Phase 2!).
Ironically, a few years ago, my friend Mike joked that my wife and I had already finished landscaping our yard, so what were we going to do next?  Then he quipped are you going to add another level?  Well, it turns out he was right!

Roof construction
The first step in this project was removing the metal roof (it went back to Home ReSource, where I will probably end up buying it again!), and reinforcing the framing to bear the weight of the new roof.
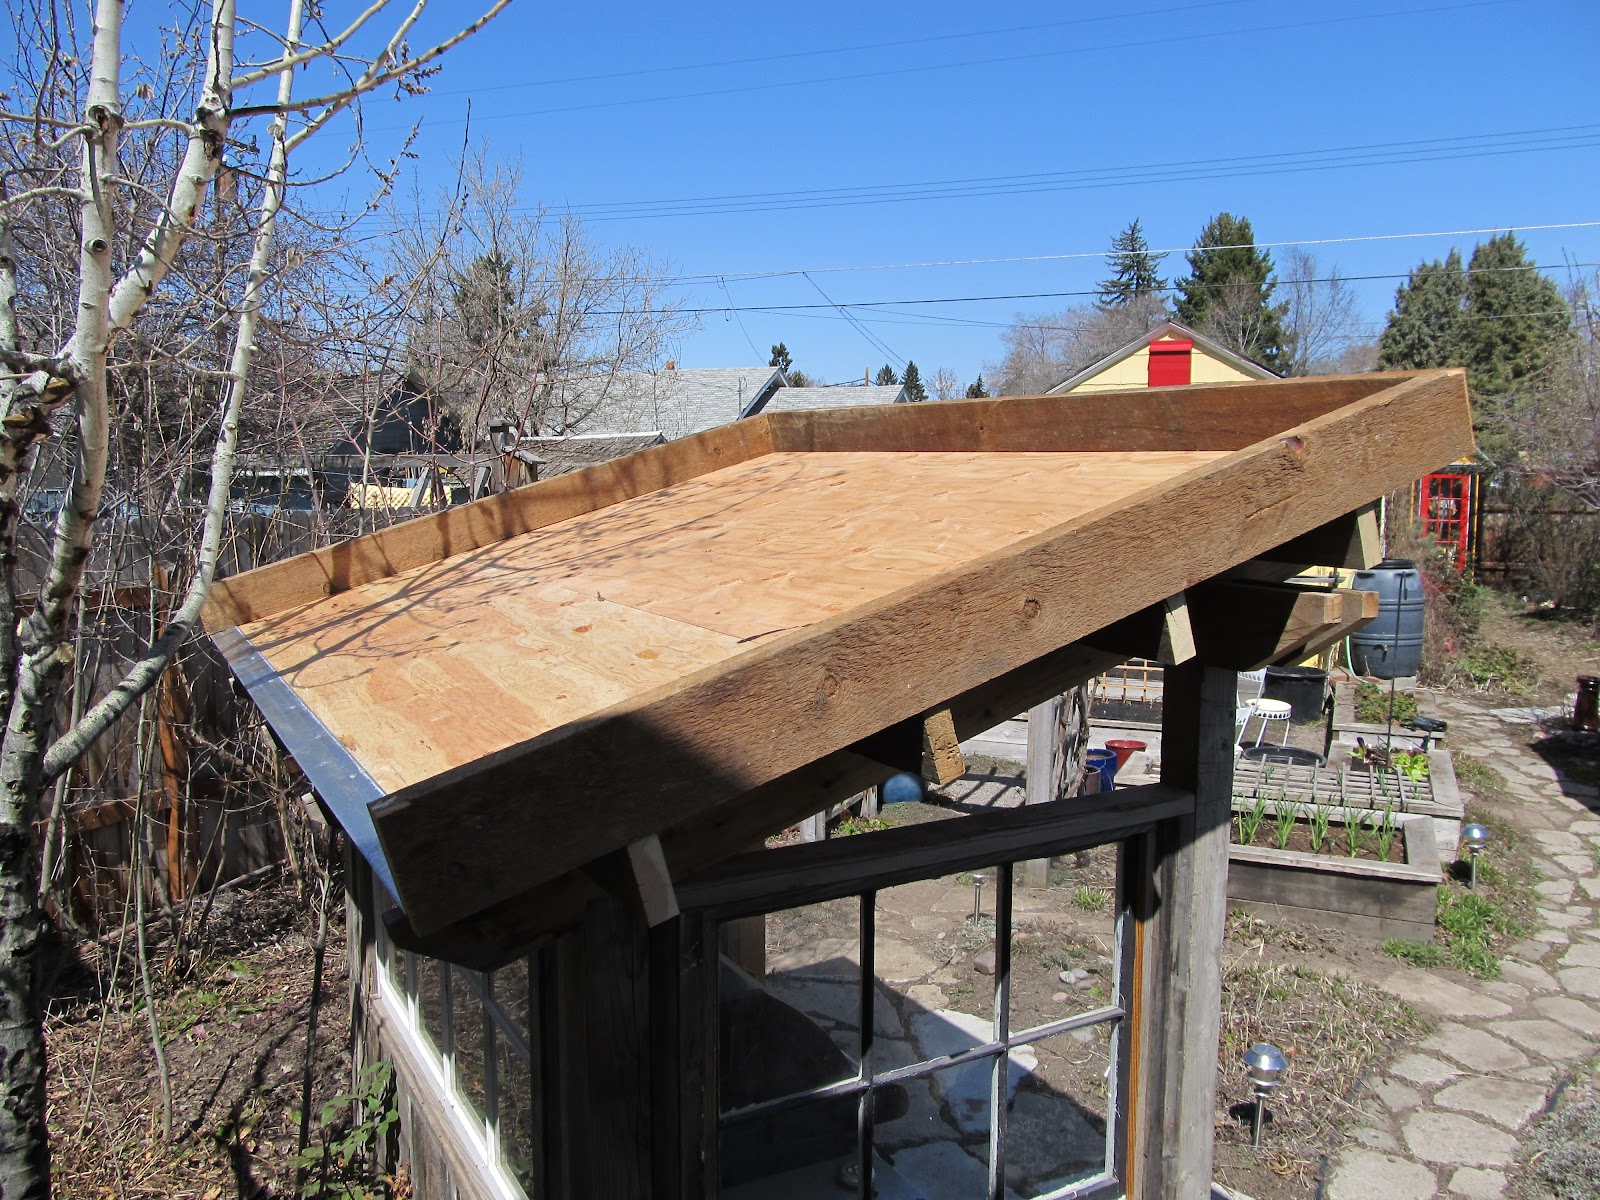
I added reclaimed 2x5 purlins on top of the rafters, and sheathed the roof in exterior grade plywood.
Then I added a reclaimed metal drip edge,
and framed the rest of the roof with reclaimed, rough cut 2 x 6.

I then installed a self adhesive waterproof membrane- this is the most expensive part of the whole project, but luckily they have a bunch of this type of material at Home ReSource.  After some looking around, I found a lot of options there.  One was a rubber pond liner- this would work great, but I wanted to keep weight down, so I went with the membrane.
On top of the membrane, I laid down landscape fabric, and fully encased the gravel drainage layer. 
I added about 2” of gravel to the roof, and the reason I fully enclosed it was so the roots did not penetrate it, and so the gravel wouoldn’t shift or fall out of the drainage in the roof.
In retrospect, this is a lot of weight.  Although gravel is cheap, I’d look for another alternative for future green roofs.  I know many manufacturers sell plastic drainage layers and that might be the best alternative.  We’ll see.
Soil mix
On top of the landscape fabric I added a rooting media.   There are a lot of differing options and opinions on soil mixes for green roofs, and this is one area I wanted to experiment with. Over the course of mixing it and applying it, I changed the ratio a few times.  My initial plan was to use equal parts of compost, pumice, and perlite.  The whole idea is to have a light weight soil mixture, that has a fair amount of volume for roots, but drains well, and does not contain too many organics.  Although I considered using other materials like sphagnum peat, crushed Styrofoam and others, I eventually ruled them out.  As this progressed, I eventually stopped using compost- I was afraid of too much nutrients for the plants and the compost I also feared might hold too much water (for weight), and I switched to composted bark mulch (soil pep) and perlite.  
This is a really light and loose mix.  I went with 3”, and I think this will work out well.  In the end, it is probably ¼ perlite, 1/3 compost, ¼ composted mulch, and 1/6 pumice.
To hold everything in place while the plants got established, I covered the roof in burlap.  This will breakdown over time, and to plant it, I just cut holes in it.
Plant selection
I really wanted to use native plants for a green roof, and that is how this whole thing got started.  We’ll see how my selection goes, but my goal is to find a mixture that includes a diversity of plant species (read: not all sedum, like many green roofs), for human interest, wildlife (insects and the like) value and aesthesis, low rooting depth (that is, no taproots), fibrous roots that with help to bind the soil, plants that seed prolifically (to fill in the roof), a diversity of heights and textures, drought tolerant, plants that are easy to grow, species that are commercially available, and plants that are relatively low growing.  
Here is what I settled on: 
  • Prairie June grass (Koeleria macrantha), bunchgrass, prolific seeder, deepest root depth of the group
  • Idaho fescue (Festuca idahoensis), bunchgrass, prolific seeder, low rooting depth
  • Yarrow (Achillea millefolium), forms a mat and spreads with rhizomes, tallest plant (when in flower)
  • Rosy pussytoes (Anntenaria rosea) - forms a mat and spreads, their light foliage reflects sun
  • Cutleaf daisy (Erigeron compositus) - these form a low mat and flower for a long time (starting in April)
  • Lanceleaf  stonecrop (Sedum lanceolatum).  I used sedum because it is a requirement on any green roof.  It is mandatory. And they enforce this.  A nice succulent, though.
  •  Elkhorn clarkia (Clarkia pulchella) this is for color- they are annuals, with very shallow roots, but they readily reseed
Plants for this project I got from my own garden, from the UM Conservation Nursery at Fort Missoula and from Kathy at Blackfoot Native Plants Nursery, and the Elkhorn clarkia I grew from seeds from Native Ideals Seed Company.
I'll post updates about the successes (or failures) and we'll see how it goes.

Tuesday, July 5, 2011

2011 Garden Projects update

At the beginning of the year, I didn't think I had too many projects planned  for the garden, but I took a little time to write down a list of things to do, and I posted it here.  This is why I have a blog- it is my garden journal and it is a place to keep track of everything I'd otherwise scribble somewhere or forget to write down about the garden.


I planted some mountain ash (Sorbus scopulina), to replace the decadent aspen (Populus tremulodes)- and I even planted another one this weekend to replace an aspen that died suddenly last weekend in front of the hammock stand (below).  I have come to think of aspen as short-lived perennials, and that is fine.  Aspen bring so much wildlife- including wildlife that eat and kill them to the garden, that it is a fair trade (click here for more information).  Plus, we actually have more aspen in the garden now than when we started- they are just in different places, and they are always coming up in new areas.

I rearranged some plants in the front prairie, including getting rid of a green rabbit brush (Ericameria viscidiflora) and added a few Wood's rose (Rosa woodsii) close to the house.  In case you are wondering, the green rabbitbrush is now living at the Native Plant Garden at 8th and Grant.  Trust me.  It is fine.

I made a "cut-off" trail in front of the onion/ garlic bed (it is kind of obscured by the plants from this vew). The area near the grill shed is kind of a congested area in the garden and by adding this new trail/ path, people will be able to flow better. 
And along the way on the list, I added more things- a "green" or "living" roof for the grill shed, I started an insect collection to learn about and document all the insects in the garden (more on this soon), I removed the overhead garage door to the shop and replaced it with French doors (below), and I did some landscaping around the new space the French doors provide.

Adding the French doors to the shop was a fun little project and one I wished I had done a long time ago.  The doors add so much light and usable space in the shop.  Plus, they just look better.  I got all the materials for this at Home ReSource (a building materials re-use center, and my favorite place in the world to shop).
Green roof update
I didn't realize how much the green roof had grown, until I looked back on the post and slideshow from this spring. In general it is doing really well.  It is starting to fill in, and weeding has not been an issue.  I watered it for the first time yesterday (I planted it on April 24, but it was a very cool, wet spring).  Now that the weather has dried out and it has gotten hot (Sorry Susan, I know this mid-80's weather is not hot) or, perhaps, the weather has gotten more seasonal, I might water it once/ week through the summer. Here are some pictures showing the progress.
The picture below was taken right after planting, and as you can see, since then it has really filled in.
Below is a view looking down on the green roof.  It looks like a little prairie- just as planned.  All the plants are native to the Missoula area and include: Prairie June grass (Koeleria macrantha), Idaho fescue (Festuca idahoensis), Yarrow (Achillea millefolium), Rosy pussytoes (Anntenaria rosea), Cutleaf daisy (Erigeron compositus), Lanceleaf  stonecrop (Sedum lanceolatum), and  Elkhorn clarkia (Clarkia pulchella).  Click here for information about the green roof, including why I chose these plants.


To see the changes on the roof- here are a few pictures:  
Before- the old metal roof.
After I installed the green roof.
After some growing- it has really changed a lot.  A little tip- for garden projects, always take your "before" pictures in late winter, and your "after" pictures in the summer!
I made great progress on the list, but I still need to make that 3 bin composter for my wife, our compost management supervisor. But a new project has come up- another grape arbor.  There is always something to do, and a place to write it down.

Monday, June 18, 2012

The Little Green Roof: a year later

Things didn’t quite go as planned. Nothing bad happened, per se, but this is not the green roof I was expecting. If you recall- my goal was to try to find some native plants to grow on a green roof. I selected species I thought would do well- those that were easy to grow, were diverse, would tolerate hot and dry conditions, and had a low rooting depth and some that would spread via rhizomes to hold the soil. I wanted this green roof to really fill in and be lush and interesting.

Below is a picture from last summer showing the diverse species.
Here was my list of species with the rationale:

Prairie June grass (Koeleria macrantha), bunchgrass, prolific seeder, deepest root depth of the group
Idaho fescue (Festuca idahoensis), bunchgrass, prolific seeder, low rooting depth
Yarrow (Achillea millefolium), forms a mat and spreads with rhizomes, tallest plant (when in flower)
Rosy pussytoes (Anntenaria rosea) - forms a mat and spreads, their light foliage reflects sun
Cutleaf daisy (Erigeron compositus) - these form a low mat and flower for a long time (starting in April)
Lanceleaf stonecrop (Sedum lanceolatum). I used sedum because it is a requirement on any green roof. It is mandatory. And they enforce this. A nice succulent, though.
Elkhorn clarkia (Clarkia pulchella) this is for color- they are annuals, with very shallow roots, but they readily reseed

Here are the results:
All the lanceleaf stonecrop  survived and only one prairie junegrass survived- everything else died. Furthermore, perhaps to add insult to injury, the stonecrop reseeded like all get-out. The yarrow that was there last year seeded, and now there is a ton of yarrow, but no survivorship.
The few clarkia I planted went to seed and are filling in exceptionally well.
So, why did this happen? I have no idea. The sedum survival was no surprise, but the amount of volunteers was a surprise. They essentially carpeted the whole roof.
It's possible the prairie Junegrass needs more rooting depth- for whatever reason. This one was kind of a stretch- it had the greatest rooting depth of the bunch (a little native grass pun). The Idaho fescue was surprising and so were the pussytoes and cutleaf  daisy-m both have a super low rooting depth. In the wild you find them growing on a rock, and they are happy with it.

Perhaps rooting depth/ rooting media depth was not the issue with some of the failures. For example, with yarrow, maybe there were too many organics in the soil, so it just flowered its head off and died last year.
The roof is actually quite beautiful, and a lot more colorful and interesting than the species composition I had envisioned. There is nothing wrong with the roof- it is just not what I expected and I don’t know why. I need another year of data, so I’ll keep you posted.

Friday, July 24, 2009

Greenwashing


I live in a green home. My home is not special, nor was it marketed as an example of “green” building. Like hundreds of houses in Missoula, it was built in the 1940's using durable materials (intended last 100+ years). Its construction contributed to the local economy and was made from locally available, sustainable materials. The wood was harvested by local workers from local forests and milled locally. It is small by today’s standards, but it is a great, useful space and occupies a small footprint, and we do not need bigger house.

I do not have an on demand water heater, fiber cement siding, photovoltaic panels, solar hot water (though I’d like to), low VOC paint, bamboo flooring (I could rant about this greenwash sometime), sustainably harvested exotic wood decking or all the other trendy “green” building products. However, when I moved into it, my entire home was 100% reused.

To me this is the best way to promote “green” building: buy a home that is already in place. It is surprisingly simple, yet in much of the green literature this view is not expressed. I think the first step in green building should be “build nothing”. But that probably won’t sell too well.
Inherently, buying, remodeling or renovating an existing home, is less impactful, less resouce intensive, and more sustainable than new construction.

I was very disappointed to read a story about green building in a magazine at the airport recently that was devoted to the topic. One article was devoted to questions and answers about how to build green. This question caught my eye, it went something like this, and I will paraphrase:

Question: Can my existing home be green or can I green it?

Answer: Maybe, but you will probably be better off building a new one and incorporating all the green features you desire.

After catching my breath and counting to three, I have to allow that, in fairness, there is some molecule of truth to this. Some things are more cost effective or practicable with new vs. existing construction. And there are a lot of limitations (read: opportunities or potential from my perspective) with my old house. For example, the walls are only 2x4 construction, location on the lot does not provide a great location for PV panels or solar hot water, when poured, my foundation was not insulated, and these things are difficult to change.

However, because of decisions we have made and our lifestyle, our home is energy efficient and “green”. Compared to other homes, we use very little water, gas and electricity and every year we strive to and do use less and less. We make improvements to the efficiency to reduce your demand, and it has been working.


As we have remodeled we have tried to be thoughtful about our choices for building materials and energy efficiency. We recently installed a metal roof after eking out all possible life from the existing roof, replaced the worst leaking windows and those on the south face of our home with efficient low e glass. We even painted our house rather than installing new siding, since our ugly siding was in perfect shape and will probably last forever (unfortunately). Throughout our remodeling projects we use reused and recycled materials whenever possible, and from local sources. We have been slowly upgrading to all energy efficient appliances, as our budget allows and as the appliances that came with the place succumb to old age. Our biggest remodel is our basement; will be mostly made from reused materials.

Obviously green building is a business, and it is a concept that is selling now. For many, building green has nothing to do with sustainable living, but is a way to justify living unsustainably. The bottom line is building and living green does not have to be expensive. We can make simple choices and thoughtful decisions, most of which require no money but often require difficult changes. I am sure many of you live in green homes, too. The biggest things you can do to green your home or life are often free.

And don’t forget your native plant garden for local wildlife.

Wednesday, August 24, 2011

Brown Roof; a Green Roof Update

Apparently brown is the new green.  This isn't really surprising though, and the golden grasses look appropriately colored for this time of the year.  After a wet and unseasonably cool spring and early summer, it's been hot and dry for weeks and it looks like the same is in store for weeks to come.

Everything is dormant now, in the hills and prairies around Missoula, and in our native plant garden, too, save for some goldenrod (Solidago rigida, and S. canadensis), blanketflower (Gaillardia arristata),  fleabane (Erigeron spp.) and hairy golden aster (Heterotheca villosa)

In my last update about the green roof on July 5, I said I'd water it once a week to get it established.  I didn't.  I guess that is one of the downsides of planting things on a roof is that they are easily overlooked. It is a little startling to look back to the first week of July and see how much the roof has changed- I'd forgotten it was so lush (see photo below).  And that happens every year.

I think the plants are fine, though.  If you look closely through the brown of the roof, a little life is showing itself.

Despite the temperatures in the mid 90's, the days are shorter, the nights longer, and and soon rubber rabbit brush (Ericameria nauseosa) will flower, and that takes us into fall.

Sunday, April 24, 2011

Green Roof for the Grill Shed; Day 1 slideshow


Yesterday, I replaced the metal roof on my grill shed with a green roof.  Above is a photo album from the first day of construction, today I am going to finish adding the soil mixture and plant some plants.  I'll have more photos and a longer post coming soon with an explanation of the green roof.

Sunday, July 27, 2014

Progress on the Project List: chicken coop update

I have made a lot of progress on the garden project list,

but the one item I have been spending the most time with recently is the chicken coop and run, and it is nearly done.

With the exception of some paint, staples and some insulation, everything was reused, re-purposed and reclaimed and everything I purchased for the project (with the exception of the tin roofing- Craigslist) came from Home ReSource.  So, like many of these projects I have been accumulated parts and pieces as I find them for some time.  That means my little shop has been full of stuff for a while.  It is nice to see some space opening up, but that just means I have some room for the next project!

So, although the chicken coop and outdoor run are not done yet, here are some pictures of the progress and some details...

 The nest box is a re-purposed kitchen cabinet and the perch is an oak towel bar.

Access to the enclosed run is provided by a little sliding barn door.  The hardware is from a sliding closet door.
Yes, that is a chandelier.  The interior paneling, roof sheathing and other interior and exterior details are made from my old cedar fence boards when I replaced some panels last fall (click here for details of that project).
 The exterior (and interior) is made from salvaged tin roofing and cedar shakes.

The coop fits in nicely in the vegetable garden.  

You can see the repetition of a theme with the divided light door, trellises etc..

The outdoor run will have a green roof (in progress).  The plan changed; originally the run was going to be south-facing and in the native plants, but now it is to the north of the coop and in the vegetable garden.

So, in keeping with the vegetable theme, I will plant strawberries on it. That means now I will have about 100 potted Sedum lanceolatum, that I have been growing since the winter and babying all summer, to deal with...