Monday, March 30, 2009

Mixed feelings for bird feeders

I have mixed feelings about bird feeders. I do use bird feeders, and they are what initially attract some species to our yard. However, I have tried to build our wildlife garden to provide more than just sunflower seeds and suet to birds, and I look for ways to reduce their (and my) dependence on feeders.

To me, wildlife gardening is about creating habitat by providing for the complex and diverse needs of many different species of animals. Relying on feeders alone feeders to attract birds isn't the same thing as creating habitat. Of the 50+ bird species we have had in our yard, probably only 10-20% actually use the feeders. Most come here because of the plants, structure, and natural foods. (Again, what may initially attract them are the feeders).

Although bird feeders do attract some desirable bird species, they also attract unwanted birds and other animals. You can spend a lot of time trying to make the feeders squirrel proof, cat proof, sparrow proof, and so on. I know I have. Another option I am considering is to not to use some kinds of feeders in the first place.

I really enjoy and take pride in our natural feeders: the anthills in our yard that the flickers excavate, and the ants that rebuild and eventually relocate; the quaking aspen and the ecology therein; the many woody plants that harbor spiders, insect eggs and other morsels that chickadees, warblers, and wrens glean; our little prairie and mostly lawn-free yard that invite juncos, white crowned sparrows, hermit thrushes and others to scratch, dig, search, and forage for food in the leaf litter; the standing and fallen snags that are home to several wood eating insects; and my unconventional hummingbird native plants. These natural bird feeders are by far my favorites.
I just had a conversation with someone who is a well-known birder and avid wildlife gardener. They asked what kind of feeders I used, and how many I maintain. I thought this was kind of an odd start to the conversation- as I mentioned feeders are not my favorite things. I told them about our one seed feeder and up to three suet feeders (3 in the winter, 1-2 in the summer). They were surprised and very unimpressed, and they told me how their 18 seed feeders, and 7 suet feeders attracted birds. This got me thinking more about bird feeders, and the goal of my garden.
Bird feeders attract pests
My other, traditional feeders which I fill with black sunflower seeds, are seasonally useful. But they often turn into areas that concentrate unwanted birds and animals, like the non-native house sparrows and squirrels, house cats and even house finches.
House finches are another story, and probably deserving of their own blog post. Though house finches are native to the southwestern US, it is unlikely they are native here. These birds were spread around the western US pervasively and now are widely established. They don’t seem to interfere with things too much, or compete with cavity-nesters, like other exotics. I do not encourage them in our yard, but I don’t treat them like squirrels or starlings, either.
Feeders also have a tendency to concentrate birds making them susceptible to predation and disease. It is important to locate your feeders when they will not be targets for house cats, but also in locations that are more natural. They should be close to cover, and to some degree mimic a natural feeding location. By locating feeders this way you will be more successful in attracting birds. Diseases often arise from unusual and unnatural concentrations of birds around feeders- the unfortunate side effect of attracting birds to a spot.

Since we live in the middle of town we do not have bears, or deer. If we did, we would would change how and when we feed. For example we would not use hummingbird feeders because hummingbirds are in Montana when bears are active, and bears love the sugar water. Also, we would only use seed or suet feeders in the winter while bears are hibernating. But, since we do live in the center of town (as opposed to living in a riparian area, on the urban interface, or bordering a natural area), attraction is important for bringing in birds.

Our feeding plan
We feed the most in the winter, and the rationale is that there is the least amount of natural food available to birds at this critical time. Also with habitat loss, it is easy to justify feeding in the winter. We use a combination of suet and black sunflower seed feeders.

In the summer, we usually let most of our feeders run dry. There are plenty of natural foods available to birds, and as a result, they don’t use the seed feeders much, anyway. We do keep the hummingbird feeders going from April- September, though.
The more I have been thinking about this, I think that we will not refill our sunflower seed feeder come fall. Though the chickadees and nuthatches like it, there is other food for them most of the year, including the suet feeders in the winter.
Feed with specific birds in mind
It is important to know what bird species you will be feeding, just as it is important to know what species are trying to entice with birdhouses. The more general you are the more you will probably end up feeding unwanted birds or wasting seed, or feed. The “wild bird” feeds are mostly low cost millet, and depending on where you live, nothing may eat this. Also, some seeds or nuts are too big for birds in your area to eat, or are only available to squirrels.

None of our feeders have perches on them. They are designed (or modified) to target the native birds that will eat the seed, and none of these species need perches. This discourages house sparrows. Although house finches will still use the seed feeders, it does not let them monopolize the feeders as they would if there were perches. The suet feeders we use act similarly- and they are really easy to build.

Building a suet feeder is a great project for children (and adults, too). They are simply a 12-20” section of about 6” diameter log with 1” holes bored into it (see photo above with Downy woodpecker). Birds like nuthatches, chickadees, downy woodpeckers, flickers, and even the brown creeper this year, really like them. I imagine the dead log, with bark, is a natural search image for them while foraging for food. The suet in the cavities probably comes as an unexpected treat.

For now, I still have a few feeders, and I will continue to feed birds in the winter, and some, like hummingbirds, in the summer. Though, in the future, I will probably have fewer feeders.

Friday, March 27, 2009

How to build a rain barrel; the prequel

The joys of March in Montana. It has been a few years since we have had a typical March- today it was 20, last week I connected my rain barrels, and the melting snow from yesterday's storms has left my barrels filled to capacity (and over-flowing). I guess my earlier proclamation about spring was a little early. This weather has not been really conducive for the gardening projects I an anxious to begin.

Here is a fun project to do when it is otherwise inhospitable to work on your other garden projects, build a rain barrel. I have gotten a bunch of questions about how to build them and although there are plenty of online resources from everything to how to build your own to buying ready to use ones, I thought I’d write a brief post about building one.

Like I mentioned, if space and money were not an issue, I’d get the biggest cistern I could fit underground in my yard, and a pump to deliver water for irrigation and other uses. But, since both limit me, several rain barrels is a cost- and space-effective, solution. Especially in a freezing climate, where disassembly in the winter is essential.

Start by getting barrels. You can go here to figure out how many you will need, and how much precipitation your area receives.
Barrels can be acquired a number of different ways, but I’d recommend buying a used, recycled plastic barrel. Most of these are food grade, and were used to ship things like olives, garlic and other smelly things (I like those smells). They are really sturdy, and have thick walls, which is important for storing hundreds of pounds of water. Unless you were going to use the barrels for heat, use a plastic one (metal is a better thermal conductor, so if you are going to use it as a solar heat sink, too, opt for metal, and again, buy them used).
You can find these barrels at recycling or re-use centers (like Home Resource, in Missoula), and other places (Craigslist, etc…). In Missoula, I got mine at the Axmen for about $25. There are a variety of sizes, the most typical is 55 gallon.

The rest of the components can be purchased at a hardware store or a re-use center. There are a lot of ways your can build a rain barrel, but the things to consider are getting water in, getting it out, keeping debris out, and letting air in (to let water out), and finally, these things weigh a lot when full (over 350 lbs, each) so make sure it is on a level, stable, elevated (to get water out) surface.

If you choose to build one for yourself, you will save a lot of money, have the option to use recycled products, and customize it to fit your needs. Plus you have the added satisfaction of building something you will use daily.

Materials
  • Barbed 90 degree, threaded fitting, washer and nut, hose for overflow
  • Ball valve spigot (aka, hose bib, sill cock), washers, nut (make sure to get a ball valve not a gate valve)
  • 4” or 6” atrium grate, and screen(for intake)
  • Downspout components, elbows (depending on style and situation)
  • 100% silicone caulk
  • Sturdy, elevated base
  • Strapping (hot water heater earthquake strapping)

If you will have two or more barrels connected in-line, you will also need

  • Vent (round, soffit vent), screen, and short length of hose
Start by figuring out a location for the barrel- here you will be limited by your downspout location. Next build a level base that is capable to supporting the weight of the barrel(s). I use cinder blocks- they are sturdy and often free or very cheap at recycling or reuse centers. You want to build the base as high as possible and convenient for safety and to have enough hydraulic head to deliver water down to your plants. Minimally, you want to be able to fit a watering can under the sill cock. When you have your base, set the barrel on top of it and determine how to connect the downspout to the barrel- they are many options here- see photos and descriptions below.

Building the barrel

Start by marking the locations for the holes you will make for the various components. Start at the top - line up barrel in a good location, screw on lid and mark location of were intake will be, where the spigot will be, and overflow will be. These location are important, because it will make it more convenient to use, and the more convenient it is, the more you will use it. Below are a couple of examples of the different intake systems I use on my two different style downspouts. The one on top is easier to work with, and uses a 6" atrium grate, with 5" diameter round downspout. The bottom photo shows a 4" atrium grate with a more standard 2"x4" downspout.
A word on height- you want to locate the spigot close to the bottom, so you can take advantage of as much water as possible, but not too close to the bottom because of sediment accumulation, or room to get a watering can access. Also, you want to think about gravity feeding, that is place the barrel as high as you can so there is enough hydraulic head to deliver water to lower plants. If you elevate the barrels, or if you are concerned about tipping, or children tipping them over, consider adding strapping to secure the barrels to the house or building. You can use earthquake strapping or kits sold for stabilizing hot water heaters (this is building code for hot water heaters in earthquake prone areas).

Once you have everything marked, using a spade or Forstner bit, drill a hole to snugly fit the sill cock – you should be able to thread it into the side of the barrel. Apply silicone to the washers and nuts to make a water tight seal. Use a ball valve, rather than a gate valve- ball valves cost more but are much less prone to wear, and they release water quicker and more efficiently.
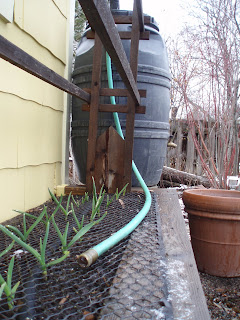
Next, drill a hole for the overflow (see photo below). Insert a fitting that will connect to a hose and use silicone and washers to ensure a tight seal. Connect a hose to the overflow that is long enough to extend far from your foundation and will reach plants that might enjoy a little water. In the photo below you can see the overflow directed to our garlic bed. You can also see the netting we apply to our beds to keep the wonderful neighbors' cats out, more on this here and I am sure, later.
Cut a hole in the top for the atrium grate (use a hole saw or a jigsaw), and cut a piece of screen to fit around it (see photos below, the second one show the screen over the atrium grate- with the barrel top up side down). The atrium grate is easy to clean leaves and other large debris but it will not keep mosquitoes out- this is where the screen comes in. Screw the atrium grate in place. If you will be connecting two or more rain barrels in series, you will need to add a vent, and an inlet hose. The inlet hose (shown below) is in the same location as the overflow hose. In the receiving barrel, you do not need a fitting for the hose, simply drill a hole just large enough to accept the hose and insert it.

Finally, cut a hole in the top for vent (use a hole saw or a jigsaw). This vent will allow air to enter the barrel if you drain it and will break the vacuum, allowing water to exit easily. Again, cover the hole with screen (see photo).

You are done. Now start collecting water.

Tuesday, March 17, 2009

Rain barrels

Feeling bold, yesterday I reconnected two of our eight rain barrels, a small rite of spring. Undeterred by the snowstorms of the last few days, I think spring is here and but just to be sure, I only reconnected the south facing ones. This time of the year we are not watering too much anyway- mainly we will be watering our compost pile, which did not freeze this winter (thanks to my wife- our compost maintenance supervisor). And hopefully, very soon, we can begin to water plants I will pot up when I start digging the foundation for my greenhouse.

Harvesting rainwater is a fun and easy way to save water and conserve one of our most important natural resources. You don’t need to invest a lot of money or excavate your entire yard to install a 10,000 gallon cistern with a solar powered pump to get going in rain water harvesting (though I’d like to). For as little as $100 you can get a few barrels, hours of fun, and a lot of water. This will probably not be enough to fulfill all irrigation needs so it is important to consider other aspects of conserving water in your landscape and around your home, but it is a start.

Other states and locations are way ahead of us in the inter-mountain west (Texas and Portland, OR are great examples), and two of the main things that deter people here from doing more with rainwater are the semi-arid conditions, and winter. Don’t let either discourage you. In fact, because of our dry climate it is even more critical to conserve the rainwater we do get.

How much water can you get?
A lot. This is the amazing thing, even in the dry climate where I live, where much of our 13" of annual precipitation falls as snow (and, thus, largely unusable for a budget-rainwater-harvester like myself), you can harvest quite a lot of rain.

I created a simple spreadsheet to calculate the amount of rainfall you could harvest from your roof and how quickly it would take to fill your rain barrels. Using this, I calculated that we get about 7.75” of usable rainfall, that is, precipitation from April through September during the growing season where we don’t have to worry about winter. The rest of the year- from October through March- I disconnect my rain barrels (see photos and discussion below) because of our water use and freezing. That 7.75" of precipitation translates into over 4,500 gallons of water. And, it only takes 1/2” of rain to completely fill our 8 rain barrels- over 400 gallons of water.

In the spreadsheet there is a worksheet that lists monthly precipitation for a few hundred US cities to help you calculate your own scenarios.

How is harvesting rain water "conservation", rain just goes into the ground anyway?
By capturing rainwater from the downspouts of your home you can store it and apply it directly toward plants or other elements in your landscape. As a result, it does not end up like the majority of rainwater coming off roofs. This water typically ends up in storm drains or sewer systems. Once in the wastewater systems, it will get stored, treated, filtered, processed, chlorinated, fluoridated (or some combination, depending on where you live), and again stored and then supplied back to you. This is resource and economically intensive.

Rainwater is better for your plants
There is really no need to use tap water -water that is treated and suitable for drinking, for watering your landscape- whether it is your vegetables in your garden or ornamental plants in your yard. Water comes from the sky just as the plants like it. In fact, rainwater is better for your plants- it is warmer and does not contain chlorine or other chemicals. Groundwater in our area is between 45-55 degrees F- this is too cold for many vegetables. Stored rainwater can be considerable warmer.

Where do you get rain barrels?
There are a lot of options here, and a lot of information suitable for a whole series of posts in itself (maybe I’ll do one at some point). There are many online garden stores that sell rain barrels already assembled. And there are plenty of websites with information on how to build your own- and there are some great sites out there. Just do a search for “rain water harvesting” or “build your own rain barrels” or something similar. Susan Tomlinson has had some recent posts with creative rainwater harvesting devices at the Bicycle Garden.

Building your own rain barrels is easy to do and a fun and rewarding project. I built ours out of recycled, food-grade plastic 55-gallon olive barrels- some had olives, pickles or garlic in them at some point, and they smell great. These sell for around $25 each.
What do you do in the winter?
In warmer climates, rainwater harvesting is a lot easier and a lot more efficient (so is solar hot water heating, but that is another story). Winterizing is an issue, and it is something you need to plan for in the beginning. As you can see from the pictures, in the winter I removed the two short elbows that connect to the rain barrel and replace it with a longer length of downspout material in the spring I do the reverse (see photo above). It only takes a couple of minutes. After disconnecting the rain barrel from the downspout, empty the rain barrels and store them for the winter. If you do not disconnect the rain barrels, you would have a heavy mess. The barrels would freeze solid all winter, probably break a few components, if not the whole barrel, and snow-melt runoff from the roof would likely lead to some crazy ice formations. But, I digress, you can also use a diverter, so you don’t have to remove and replace sections, but my system is pretty simple and allows emptying and inspection.

Monday, March 16, 2009

A new bird to our yard

Today we were visited by a Brown Creeper- not a rare bird, but not too common either. This is the first one in our yard. It spent a lot of time searching for, and gleaning, insects and spiders from the crevices in the bark of ponderosa pine (Pinus ponderosa), and hawthorn (Crataegus douglasii), and visited the suet feeder where I took this picture. They are pretty easy to approach, and picture, their main defence is their camouflage, and when spotted they usually freeze and let their cryptic plumage do the rest.
This was a really exciting addition to the fauna of our back yard- it has been a couple of years since we've had a new species. I suspect this one will not stay long- they prefer mature forests- and it is probably in the middle of its seasonal migration, if only a change in elevation.

Saturday, March 14, 2009

A tiny harbinger of spring


It feels like spring has officially begun. The weather has been teasing us- below zero, snow, then mid 40’s, and back again. But Friday, this little fellow the sagebrush buttercup (Ranunculus glaberrimus) made its appearance and it looks like it might be time to get back to gardening.

In our front yard, where this picture was taken, we have over 70 species of plants native to the Missoula area, and, in total, we have many more species in our yard. If you look carefully you can see some little yarrow (Achillea millefolium), a young Idaho fescue (Festuca idahoensis), the leaf of a Wilcox's penstemon (Penstemon wilcoxii), and the leaves of some obscure native annuals that only my wife knows.

By having this much diversity in our yard, there is always something going on that is both visually interesting and biologically inviting. Sagebrush buttercups are the first to flower, usually in early March, and rubber rabbitbrush (Ericameria nauseosa) is the last in as late as October. Diversity also really helps to be inclusive to many insects and other animals- providing both food and habitats not only for individual species but it allows for interactions between species to occur and provides for the needs for multiple stages of the life cycle of an animal (for example, both larvae and adult).

Anyway, it is nice spring is on the way.

Tuesday, March 10, 2009

Where to begin...

Where to begin…
Now that weather forecasters have predicted wind chills of –20 for tomorrow, this seems like a good time to think about an important part of gardening and landscaping: planning. Though I have been itching to start work on my greenhouse, this is great weather for planning and thinking.

A recent comment got me thinking about how to begin a garden. Also, I was reminded that I need to start thinking about this, since I’ll be teaching a class at the Montana Natural History Center in May on landscaping with native plants and garden design.

Beginning any project can be intimidating, but it does not need to be. I am always reminded of some advice from my gardening friend, Mike, “you can always dig it up or compost it”. So with that, get out there and start digging (well, not just yet because the ground is still frozen).

My biggest reccomendation is to design the space with you in mind and how you will use it. Too often gardens are designed for the plants they showcase (which is fine, if that is your goal), rather than how you will interact with the landscape and sit, relax and enjoy the space. Include as much seating and places to relax as possible. The more easily it is used, the more you will use it.
Develop a plan
This is really important, but again it does not need to be overwhelming and should not be an impediment. Start with a rough sketch or go to Google earth and print out a layout of your yard. Begin by examining the whole yard, not just a piece of it. Even though I encourage you to start small, plan for the whole thing and you will end up with an integrated plan that works together, as opposed to a bunch of pieces. In the photo above of our backyard, taken from our roof, I was able to get a sense of what was working and what was not- a perspective you can't get on the ground. This view lead to some changes (see below).

Consider how you will use the space
Make a list of what you want in your yard and what you want to do in your yard. In our yard, for example, we have a series of rooms for different activities: dining, cooking, laundry, sleeping (the hammock room), vegetable gardening, potting plants, entertaining, etc…

Consider what parts of the yard are appropriate for what activity, public vs. private space, shade, sun, etc… For example our front yard is the most public and sunny space, so we have a dry, Missoula short grass prairie. Because of its “public-ness” and the southern exposure, it is not the best place to take a nap, for example. This site has interpretive signs and garden markers, to encourage education and public outreach. On the other end of the spectrum is our hammock stand located in the most shady and private part of the yard.


Below are a few photos before, during, and after converting this corner of the yard from a lilac tree, which occupied a surprisingly large space that we did not use, to this hammock room that we (read: my wife) use a lot now.

Determine site characteristics
This can take some time. In our yard, we are determined to not irrigate anything but vegetables and we have been able to accomplish this goal by considering the shade (a surrogate for water), and sun that specific areas receive and planting those areas accordingly.

Here are a couple of photos that illustrate a recent change in our landscaping. There was one patch of lawn that was very difficult to grow grass on- it was in a spot that did not receive shade from the house in the summer (though it does get some shade in the spring and fall). Last year I finally removed it and planted with native plants that do much better.


For reference, the birdbaths and clothesline screen in the photos below are in the same place, and the area that did not grow grass (where the dead grass is) is above and to the left of the birdbath in the middle of the picture.

Start small
This is where people can get overwhelmed and intimidated, don't try to landscape your whole yard at once. Start with a small, manageable size, work with it, plant it, weed it etc.. and see how things go. Like I have mentioned, native plants, even drought tolerant plants, take maintenance and management- it is xeri-scaping, not “zero-scaping”.

This photo below, shows one of the first projects we did in our backyard. We started small, though at the time this seemed like a huge change. For reference, this is the same corner of the yard the hammock stand (photos above) now occupies.
Start digging!
Or more appropriately, start drawing and thinking.

Monday, March 9, 2009

Northern flickers and European starlings

There have been three flickers in the yard everyday now for about a week or so, one female and two males. They seem to be fighting for her attention, and for the cold ants in our anthill . By Saturday morning it looked like one had the upper hand in the battle for her affection and the nest box (see the handsome gentleman above). The disconcerting, yet predictable part about flickers is there relationship with European starlings. Saturday morning also marked the first day of the year where I saw a European starling in my yard. This is not good, but I knew it would happen as soon as excavation started on the nest box.

Few are aware of the relationship between European starlings and flickers. A really unfortunate trend in the expansion of European starlings is the colonization and parasitism of flicker nesting cavities. Northern flickers are an incredibly vital component to forested ecosystems across the country. They are abundant primary excavators and so many species (secondary excavators) rely on them to hollow out nest sites in standing snags. The large cavities they create are used by other birds (including screech-owls, and American kestrels), and animals, after lfickers abandon them in the summer. Northern flickers are ground feeding woodpeckers that mainly eat ants. Because of their abundance, northern flickers can control populations of ants including wood-boring species.

As secondary excavators, European starlings, rerly on flickers to excavte a cavity and an entrance hole of roughly the same size as a northern flicker. The starlings let the flickers do the work of finding a suitable site, excavating a cavity and then the starlings move in to over take the flickers and seize the nesting cavity.

Northern flicker status: population declines
Recently there has been a lot of concern over status and population trends of northern flickers. Although they are still abundant, they have declined over the past 20 years. This decline is from a combination of factors, including habitat loss, nesting site loss, competition with European starlings, and even from lawn insecticides. These declines, coupled with the loss of habitat and ever-encroaching invasive species can have serious, deleterious effects on many bird species and other wildlife.

What you can do
Providing a nest box is a start, since snags are often removed, reducing the availability of nest sites for flickers and other cavity nesting species. But just providing a nesting place is not enough. It is a huge responsibility of nest box stewards to protect the nest box from invasion by European starlings.

If European starlings begin to use your nest box, do not just add more nest boxes to attract flickers - this will only get you more starlings. Do what you can to dissuade starlings from nesting, and this usually means lethal control, similar to squirrel management. However, begin first by plugging up any entrance holes where they may be nesting, remove their nesting material. Or remove their eggs.

Unlike woodpeckers, European starlings bring in nesting material to their cavities. This is likely an adaptation that most secondary cavity nesters employ. Since they do not excavate a clean, parasite-free area for their nestlings, they will line their nests with green, fragrant herbs as an insecticide.

Some think that northern flickers are adapting to European starlings nesting later, after European starlings have fledged. This is more than likely a nice little wish. With climate change and other factors, if nothing else, northern flicker (and other species) nesting dates might be getting earlier, rather than later. Nest timing is critical and centers on resource availability. If northern flickers are indeed nesting later, it is probably to their detriment.

European starlings in North America
European starlings have a very interesting and storied history in our country. The first two attempts to introduce the European starlings into North America failed; unfortunately the third attempt did not. There are now an estimated 200 million European starlings in North America, one-third of all the European starlings in the world. All the European starlings in North America descended from 100 that were released in New York’s Central Park by Eugene Schieffelin in 1890 (60 birds) and 1891 (40 birds).

Although many believe Schieffelin was trying to introduce every bird species mentioned in the works of Shakespeare to North America, there is little evidence to support this. It is more likely he was merely trying to control pests, and probably the same pests that he tried to get rid of when he introduced the house sparrow 30 years prior. Although the house sparrow, and European starling introductions were quite successful, fortunately his attempts to introduce bullfinches, chaffinches, nightingales, and skylarks were not. Busy guy.

Although ecologically devastating, biologically it is actually really interesting that European starlings survived and flourished, despite being descended from such a small source. Evidently, this genetic bottleneck has not adversely affected the persistence of European starlings in this country.

European starlings are generalists in the food they eat and habitats they use. Furthermore, European starlings tolerate human-modified landscapes, and proximity to humans- habitats that many native species are driven from. European starlings are aggressive and gregarious and easily compete with native birds for resources. They form huge flocks (up to a few thousand birds), to feed and roost, and they have a high tolerance to nesting in close proximity to one another.

European starlings tolerate suburbs and urban areas and flourish with conventions like lawns. They do really well foraging in lawns, much better than native birds like American robins that people commonly see feeding in lawns (one of the few native birds to do so). One of the main reasons European starlings do so well in lawns, is that they excel at excavating worms and insects out of the tightly woven turf grass. Their jaws have remarkable strength for opening (as oppesed to closing), and this makes them adept at opening a hole large enough in turf to remove worms and insects. By providing a lawn, this is one of the few species that will benefit.

Because they are so abundant, and good insectivores, there is the misconception that European starlings are great “biological control” agents and can be used to control insect pests in agricultural settings. But because they are such generalist feeders, they will not just eat "pests" but also important agricultural crops like grapes, olives, and tomatoes. In Australia, where they were introduced for pest control, European starlings now threaten the country's economy and biodiversity.

Friday, March 6, 2009

What is a weed?

Kate, The Manic Gardener, recently commented on Ecology of Quaking Aspen, and questioned whether planting quaking aspen would be akin to inviting tree-sized weeds into the yard. This got me thinking about "what is a weed".

Town Mouse/ Country Mouse had a similar post recently on terminology and I thought I would add to that. Here I will try to briefly define some common terms.

Weed
A “weed” is any unwanted plant. This is a totally subjective term that refers to someone’s arbitrary goals and objectives. What is a weed in my lawn might be a wanted plant a few feet away, and vice-versa.

I have several plants in my garden that many gardeners consider weedy. What is weedy to some may be hardy, drought tolerant, and easy to grow to others. Pictured in this post are Wood’s rose (Rosa woodsii), showy milkweed (Asclepias speciosa), Missouri goldenrod (Solidago missouriensis ), and white yarrow (Achillea millefolium), all Missoula area native plants, and wonderful for wildlife. All are drought tolerant, and easy to grow and all are considered weedy. Wood’s rose, quaking aspen (Populus tremuloides), milkweed, fireweed (Chamerion angustifolium) and goldenrod are often considered weedy because they spread with shallow rhizomes or runners.
If you are uncomfortable with their tendency to spread, you can be control this tendency by planting them in an open-bottomed pot, surrounding them in a garden bed with lawn edging, or like I do, by digging them up and potting them to move to other areas of the yard. Almost anytime in the summer I have potted aspen, goldenrod, rose, milkweed and others awaiting a new home.

There are some plants in our yard that I do consider weedy and I spend a bit of time reducing their numbers, but I am not so concerned that I want to get rid of them. Rather I like to manage how many I have. In our garden the plants I consider weedy are bluebunch wheatgrass (Pseudoroegneria spicata), the Montana’s state grass, and blue (or prairie) flax (Linum lewisii). Periodically I dig up the unwanted ones and pot them for other people (the liberated bluebunch is especially enjoyed by a wonderful landscape architect friend of mine). Having these "weeds" is not really the end of the world.

We do have a lot of plants in our yard that are excellent "volunteers" that gladly spread around the yard. Some might find this annoying and "weedy," but I completely enjoy it. Plants in this category include rubber rabbit brush (Chrysothamnus nauseous), false lily of the valley (Smilacina stellata), Canadian white violet (Viola canadensis, pollinated and spread by ants), showy fleabane (Erigeron speciosa), hairy golden aster (Chrysopsis villosa), thimbleberry (Rubus parviflorus), or even blue-eyed Mary (Collinsia parviflora).

I look forward to my spring routine of carefully digging up wayward false lily of the valley and canaidan violet runners and potting them up. They root so quickly that ususally in a week I can transplant them or give them to friends. Also, stray blanket flowers (Gaillardia arristata), showy fleabane, and Wilcox's penstemon (Penstemon wilcoxii), frequently invade my little patches of lawn. These, too, I carefully dig up and pot for transplant. This is how we get most of our plants now- from other areas of the yard. I have my a eye on a bunch I want to pot up now, I just need for some snow to melt and the ground to thaw!

Native
In this country, “native” is typically defined as a plant that was here prior to European establishment, and was not transported or introduced by humans. Obviously, the big thing with “native” is scale, and this is where subjectivity comes into play, because often a species' “nativeness” relies on an artificial, arbitrary, political boundaries.

For example, “Montana native" quickly loses meaning when you think of the wide variety of elevations, habitats, climates, plant communities and topography of this state. Western red cedar (Thuja plicata), for example, is native to the damp, shadowy forests in extreme western Montana, but is not appropriate to the prairies of eastern Montana, even though it is native to Montana.

That is why in our garden we use plants that are not just native to the state, but native to the immediate Missoula area. Using locally native plants, we do not have to water them, and they attract a variety of insects and animals to our small yard.
Cultivar
There are many native genera that have been cultivated for use by gardeners- these are called "cultivars". A cultivar is a plant that has been selected and bred for specific traits. The unfortunate thing I have found is that many nursery workers do not understand these distinctions. Many well-intentioned gardeners, have returned home with plants they purchased that they thought were native, but were cultivars of native plants often bearing little resemblance to their native cousins.

You often see pink yarrow (Achillea spp.), enormous bunches of blanket flower (Gaillardia spp.), all sorts of juniper (Juniperus spp.), hybrid penstemons, assorted spireas, and different colored potentillas, in the native sections of nurseries. And althogh the genus is native, the plants are not. The problem with cultivars are many; ranging from conservation issues to wildlife and site appropriateness. If the cultivar were close enough to the native speices, and you lived in the vicinity of the native species, they could hybridize and this could be a conservation issue. On the other end of the spectrum , if the cultivar is too dissimliar to the native plant, the timing of the bloom, emerence, fruiting or of the aspects could be so foreign that it is not very useful to native insects and other animals that use and rely on the native. Finally, the cultivars are typically bred for traits that might suit a wide range of habitats, allowing them to be sold all over the west or the country. These generic traits might no longer match the conditions found in your yard or in its native locale.

When procuring native plants, try to find the most "native" native plants you can, and this could take some doing, but it is a fun and rewarding endeavour. It usually does not require you to collect seeds and grow all your own plants for yourself. That is, unless you were looking for an excuse to do that.

Endemic
An "endemic" plant is one that has a very limited geographic area or region. Physical, climatic and biological factors can contribute to endemism. Endemism can arise in two ways, either from a shrinking range, called paleoendimism, or more commonly as a result of reproductive isolation that leads to speciation or the creation of a new species. Because of their inherent limited geographic distribution, endemics can easily become threatened, endangered or extinct. Endemic species are prone to manifesting themselves on islands - either literal or figurative-because of geographic and reproductive isolation. In Montana, we have few endemic animals, though a couple of noteworthy endemic plants, including the Missoula phlox (Phlox missoulensis), which is limited to a small area- a relic of alpine habitat on a windswept ridge above Missoula.

Wild or Naturalized
"Wild" or "naturalized" is not the same as native. These terms refer to a plant or animal that is introduced and is doing quite well on its own- "feral" for lack of a better term. These species are reprodiucing and sustaining a population without the help of humans. Often these terms are used to describe non-native plants or animals we have given up on trying to control. Many confuse naturalized with native, and in many parts of the country (California and the east coast of the US, for example), few know or remember the native plant communities because of generations of human-induced changes to the flora.

Exotic or non-native
"Exotic" or "non-native" refers to a speices that is originally from outside a particular area. This does not imply it is "invasive" (see below), and can represent anything from a plant native to somewhere else in the US, or one native to Asia. Tomato plants are exotic or non-native to North America, but they aren't really a conservation threat. They do not escape and become wild or naturalized. On the other hand, some exotics do become invasive, and that is where the real problems begin.

Invasive
Invasive plants, which are usually non-native, become a nuisance, displace of native species, and spread and become eastablished quickly. Invasive species you may be familiar with include leafy spurge (Euphorbia esula), yellow star-thistle (Centaurea solstitialis), and kudzu (Pueraria montana), just to name a very few. The good news about exotic or non-native species is that very few introduced plants and animals become invasive. This is really good since thousands of species have been introcued to this country and continue to get introduced, annually. The bad news is that the few invasive species we do have in this country are cuasing significant ecological and econonic damage and in many cases they will never be eradicated.

Noxious
"Noxious" is a legal term defining a plant designated by state or federal agricultural agencies as ones that are injurious to "agricultural and/or horticultural crops and/or humans and livestock". Noxious weeds are required by state or federal law to to controlled.

Many invasive plants, and many noxious weeds, were intentially introduced as ornamental plants in garden settings and have since escaped. A few famous examples include Dalmatian toadflax (Linaria dalmatica), purple loosestrife (Lythrum salicaria), and salt cedar (Tamarix ramosissima). This is where you have to consider your plant selection and the effects or your own small garden in the environment. Another good reason to garden with native plants: if they spread outside your yard, they are just returning from whence they came, they will not wreak havoc on your local ecosystem.

I was recently asked by a journalist writing a story about planting native shrubs and trees for birds if there were any Montana native plants that were noxious weeds. The answer is no. For a list of Montana noxious weeds and other information click here .